I combined FLUX Fill with ControlNet for structured inpainting
I've been experimenting with FLUX.1-Fill-dev lately and kept running into the same wall: the Fill model is great for mask-based edits, but there's no built-in way to feed it a ControlNet signal (depth, canny, pose, etc.) at the same time.
**The idea is simple:**
FLUX Fill handles the mask-based edit, while ControlNet guides the structure using inputs like **depth, canny, pose, tile, blur, gray, or low-quality conditioning**. This makes the inpainting more controlled, especially when you want the generated object or edit to follow a specific structure or composition.
Since **FLUX.1-Fill-dev was not originally trained jointly with ControlNet**, this is more of an experimental/community implementation. In practice, it works well for structured inpainting, but results depend a lot on the mask quality, control image alignment, and conditioning strength.
**Links**
* Personal Repo : [https://github.com/pratim4dasude/pipline\_flux\_fill\_controlnet\_Inpaint](https://github.com/pratim4dasude/pipline_flux_fill_controlnet_Inpaint)
* Pipeline file (Diffusers community): [https://github.com/huggingface/diffusers/blob/main/examples/community/pipline\_flux\_fill\_controlnet\_Inpaint.py](https://github.com/huggingface/diffusers/blob/main/examples/community/pipline_flux_fill_controlnet_Inpaint.py)
* Community Pipelines README (FLUX Fill ControlNet section): [https://github.com/huggingface/diffusers/tree/main/examples/community#flux-fill-controlnet-pipeline](https://github.com/huggingface/diffusers/tree/main/examples/community#flux-fill-controlnet-pipeline)
* FLUX Pipelines docs: [https://huggingface.co/docs/diffusers/api/pipelines/flux](https://huggingface.co/docs/diffusers/api/pipelines/flux)
* ControlNet in Diffusers docs: [https://huggingface.co/docs/diffusers/api/pipelines/controlnet\_flux](https://huggingface.co/docs/diffusers/api/pipelines/controlnet_flux)
**Code example**
import torch
from diffusers import FluxControlNetModel
from diffusers.utils import load_image
from pipline_flux_fill_controlnet_Inpaint import FluxControlNetFillInpaintPipeline
dtype = torch.bfloat16
device = "cuda"
controlnet = FluxControlNetModel.from_pretrained(
"Shakker-Labs/FLUX.1-dev-ControlNet-Union-Pro-2.0",
torch_dtype=dtype,
)
fill_pipe = FluxControlNetFillInpaintPipeline.from_pretrained(
"black-forest-labs/FLUX.1-Fill-dev",
controlnet=controlnet,
torch_dtype=dtype,
).to(device)
img = load_image("imgs/background.jpg")
mask = load_image("imgs/mask.png")
ctrl = load_image("imgs/dog_depth_2.png")
result = fill_pipe(
prompt="a dog on a bench",
image=img,
mask_image=mask,
control_image=ctrl,
control_mode=[2],
# canny=0, tile=1, depth=2, blur=3, pose=4
controlnet_conditioning_scale=0.9,
control_guidance_start=0.0,
control_guidance_end=0.8,
height=1024, width=1024,
strength=1.0,
guidance_scale=50.0,
num_inference_steps=60,
max_sequence_length=512,
)
result.images[0].save("output.jpg")
If you find this useful, a GitHub star ⭐ would really help support the project.
https://redd.it/1tb5v89
@rStableDiffusion
I shipped an offline SD app for Android. It's slow, your phone will get warm, and it's completely free.
https://redd.it/1tb7v3q
@rStableDiffusion
https://redd.it/1tb7v3q
@rStableDiffusion
Reddit
From the StableDiffusion community on Reddit: I shipped an offline SD app for Android. It's slow, your phone will get warm, and…
Explore this post and more from the StableDiffusion community
Alice v1: Distillation-Enhanced Video Generation Surpassing Closed-Source Models
https://arxiv.org/abs/2605.08115
https://redd.it/1tbaspl
@rStableDiffusion
https://arxiv.org/abs/2605.08115
https://redd.it/1tbaspl
@rStableDiffusion
arXiv.org
Alice v1: Distillation-Enhanced Video Generation Surpassing...
Wepresent Alice v1, a 14-billion parameter open-source video generation model that achieves state-of-the-art quality through consistency distillation with score regularization (rCM). Contrary to...
Ostris/AI-Toolkit Supports HiDream O1 Training
\- Ostris github repo
\- HiDream-O1-Image repo
According to Ostris, on X/Twitter, disable caching text embeddings: "There are not text embeddings. Tokens go directly in." He has some other comments/replies on his Twitter that might be useful, but no magic bullet fix.
\- ComfyUI versions of checkpoints.
\- Test ComfyUI workflow can be found here. Still no official workflow in templates at the time of this post.
https://redd.it/1tbby44
@rStableDiffusion
GitHub
GitHub - ostris/ai-toolkit: The ultimate training toolkit for finetuning diffusion models
The ultimate training toolkit for finetuning diffusion models - ostris/ai-toolkit
Chroma1-HD Character Transfer with Flux.2 Dev
Chroma1-HD with Flux.2 Dev character transfer
This workflow gives multi-modal capabilities to open-source image models. In particular, this workflow combines a text-to-image workflow (Comfy's official Chroma1-HD workflow) and an image-to-image workflow (Comfy's official Flux.2 Dev workflow).
Link to workflow: https://huggingface.co/ussaaron/workflows/blob/main/chroma\_flux\_character\_transfer.json
This workflow is the final result of a ton of experimentation to solve one problem: Using an image reference for a consistent character kneecaps the creativity of an image model. For example, if I want to create a cool cinematic shot with a specific style, including an image reference will reduce the image model's style output into a pretty narrow lane. Generally, the final image will share most of the stylistic elements present in the character image and that's not ideal.
I selected the models for this workflow, because after a ton of testing, I determined that they are the best for each modality. I concluded that Chroma1-HD is the best open source model for style flexibility and professional photography. I concluded that Flux.2 Dev is the best open source model for facial fidelity and character consistency.
However, just combining these two models is not enough to produce a consistent character transfer solution. I also structured the prompts for both sides of the workflow in a specific way to ensure cohesion from end-to-end. The full prompts are included in the workflow for you to check out.
And here's how it went.
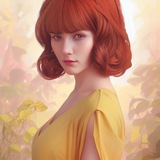
This is my character reference for Crystal Sparkle - a Sora character. I made a 1980's style model composite of her with an 80's hairstyle (make sure your character has a hairstyle consistent with the era in your Chroma image).
Model composite for Crystal Sparkle
This is the output of the Chroma prompt for a blonde woman wandering through a post-apocalyptic New York City inspired by 1980s grindhouse and sci-fi b-movies.
Choma1-HD Text-to-image output
This is the Flux.2 Dev output after completing the character transfer for Crystal Sparkle.
Flux.2 Dev Image-to-image output
The final result is exactly what I wanted. The Chroma1-HD style, grain, grunge elements were retained and Crystal was cleanly added into the shot. This example is just one of thousands of possibilities that are now available with Chroma1-HD.
Note: The settings in this workflow are tuned more for people that want professional photography output. All the settings can be dialed back as needed. Also, there are a few optional LoRAs that can be removed as needed.
Let me know if you have any questions. Cheers!
https://redd.it/1tbdj5o
@rStableDiffusion
Chroma1-HD with Flux.2 Dev character transfer
This workflow gives multi-modal capabilities to open-source image models. In particular, this workflow combines a text-to-image workflow (Comfy's official Chroma1-HD workflow) and an image-to-image workflow (Comfy's official Flux.2 Dev workflow).
Link to workflow: https://huggingface.co/ussaaron/workflows/blob/main/chroma\_flux\_character\_transfer.json
This workflow is the final result of a ton of experimentation to solve one problem: Using an image reference for a consistent character kneecaps the creativity of an image model. For example, if I want to create a cool cinematic shot with a specific style, including an image reference will reduce the image model's style output into a pretty narrow lane. Generally, the final image will share most of the stylistic elements present in the character image and that's not ideal.
I selected the models for this workflow, because after a ton of testing, I determined that they are the best for each modality. I concluded that Chroma1-HD is the best open source model for style flexibility and professional photography. I concluded that Flux.2 Dev is the best open source model for facial fidelity and character consistency.
However, just combining these two models is not enough to produce a consistent character transfer solution. I also structured the prompts for both sides of the workflow in a specific way to ensure cohesion from end-to-end. The full prompts are included in the workflow for you to check out.
And here's how it went.
This is my character reference for Crystal Sparkle - a Sora character. I made a 1980's style model composite of her with an 80's hairstyle (make sure your character has a hairstyle consistent with the era in your Chroma image).
Model composite for Crystal Sparkle
This is the output of the Chroma prompt for a blonde woman wandering through a post-apocalyptic New York City inspired by 1980s grindhouse and sci-fi b-movies.
Choma1-HD Text-to-image output
This is the Flux.2 Dev output after completing the character transfer for Crystal Sparkle.
Flux.2 Dev Image-to-image output
The final result is exactly what I wanted. The Chroma1-HD style, grain, grunge elements were retained and Crystal was cleanly added into the shot. This example is just one of thousands of possibilities that are now available with Chroma1-HD.
Note: The settings in this workflow are tuned more for people that want professional photography output. All the settings can be dialed back as needed. Also, there are a few optional LoRAs that can be removed as needed.
Let me know if you have any questions. Cheers!
https://redd.it/1tbdj5o
@rStableDiffusion