
AMBER CHOC Switch
We are (https://junkfoodarcades.com/) working with KailhSwitch to build a new low-profile switch with a new level of performance at just 1mm of pre-travel!
MUCH faster actuation than most other speed focused competitors in a CHOC form factor.
Currently in design so the color choices may change but we are calling it the AMBER switch and it will be exclusive to us! Look for it this summer!
#news
We are (https://junkfoodarcades.com/) working with KailhSwitch to build a new low-profile switch with a new level of performance at just 1mm of pre-travel!
MUCH faster actuation than most other speed focused competitors in a CHOC form factor.
Currently in design so the color choices may change but we are calling it the AMBER switch and it will be exclusive to us! Look for it this summer!
#news
CFX BoW Update
We wanted a cleaner and crisper appearance for our BoW keycaps. So we have decided to use a brighter white for BoW.
In comparison, the 1U White blanks are more yellowish-white. The difference is more noticeable on the actual product.
We will be adjusting the 1U white's color to match the BoW for the next batch.
#news
We wanted a cleaner and crisper appearance for our BoW keycaps. So we have decided to use a brighter white for BoW.
In comparison, the 1U White blanks are more yellowish-white. The difference is more noticeable on the actual product.
We will be adjusting the 1U white's color to match the BoW for the next batch.
#news
3D models of the Kailh Choc V1 Switch by koktoh
* Black
* Brown
* Red
* White
* Red Pro
* Sunset Tactile
#3dmodel • #kicad • #designing
* Black
* Brown
* Red
* White
* Red Pro
* Sunset Tactile
#3dmodel • #kicad • #designing
kicad-kbplacer by adamws
KiCad plugin for mechanical keyboard design. It features automatic key placement based on popular layout description from keyboard-layout-editor
Features
- Automatic keys and diodes placement
- Support for different annotation schemes
- Basic track routing
- Key rotation support
- User selectable diode position in relation to key position
#kicad • #designing
KiCad plugin for mechanical keyboard design. It features automatic key placement based on popular layout description from keyboard-layout-editor
Features
- Automatic keys and diodes placement
- Support for different annotation schemes
- Basic track routing
- Key rotation support
- User selectable diode position in relation to key position
#kicad • #designing
🔥2
Rommana by AlaaSaadAbdo
A 30 key well powered by Xiao BLE
Features
* 3D printed hot-swappable sockets
* twisted wire connections
* no solder
#mx • #xiao • #ble • #zmk • #handwired • #3d • #30key
A 30 key well powered by Xiao BLE
Features
* 3D printed hot-swappable sockets
* twisted wire connections
* no solder
#mx • #xiao • #ble • #zmk • #handwired • #3d • #30key
SplitKBD
Lofree & Kalih Announces Shadow: World's First Series of Full POM Material Low-Profile Switches #news
YouTube
【大注目ロープロファイルキーボード】 Lofree Flow レビュー | Lofree Flow : Custom Mechanical Keyboard Review
Lofree Flowは以下の特徴をもったワイヤレスな薄型のロープロファイルキーボードです。
私は静かで滑らかなスイッチと打鍵感を追求したガスケットマウントおよび内部の静音機構が特に気に入りました!
- 完全に POM 素材で作られた世界初の薄型スイッチ(Kailh Full POM Switches)を採用
- 世界初のガスケット マウント ロープロファイル キーボード
- オールアルミニウムのボディ
- 極薄ケース
- ホットスワップ対応
- ワイヤレスまたは有線 に対応
- RGBSidelit、White…
私は静かで滑らかなスイッチと打鍵感を追求したガスケットマウントおよび内部の静音機構が特に気に入りました!
- 完全に POM 素材で作られた世界初の薄型スイッチ(Kailh Full POM Switches)を採用
- 世界初のガスケット マウント ロープロファイル キーボード
- オールアルミニウムのボディ
- 極薄ケース
- ホットスワップ対応
- ワイヤレスまたは有線 に対応
- RGBSidelit、White…
🥱1
Lapa by lemosbor
Lapa (Russian: Лапа, paw) - split keyboard-mouse with 36 keys (40%) for typing without moving the hands.
Features
* The wrist-rest is part of the keyboard and is located above the main row keys.
* The built-in mouse sensor allows you not to transfer your hand from the keyboard to the mouse.
* The thumb keys are located on a separate part of the case, much higher than other keys.
* The keys of each finger are located on several circles of different diameters, forming a "stairs". This solution provides maximum perpendicularity of the keystroke vectors to the key surfaces.
* Minimum height. The surface of the lowest key is at a distance of 2 cm from the table.
* The keycaps are flush with the body.
* Replaceable oak pad for resting the wrist.
* Reliable russian connector РШ2Н-1-6 for connecting two halves of the keyboard.
* Magnets to connect the two halves of the keyboard for transporting.
#mx • #promicro • #qmk • #handwired • #3d • #36key
Lapa (Russian: Лапа, paw) - split keyboard-mouse with 36 keys (40%) for typing without moving the hands.
Features
* The wrist-rest is part of the keyboard and is located above the main row keys.
* The built-in mouse sensor allows you not to transfer your hand from the keyboard to the mouse.
* The thumb keys are located on a separate part of the case, much higher than other keys.
* The keys of each finger are located on several circles of different diameters, forming a "stairs". This solution provides maximum perpendicularity of the keystroke vectors to the key surfaces.
* Minimum height. The surface of the lowest key is at a distance of 2 cm from the table.
* The keycaps are flush with the body.
* Replaceable oak pad for resting the wrist.
* Reliable russian connector РШ2Н-1-6 for connecting two halves of the keyboard.
* Magnets to connect the two halves of the keyboard for transporting.
#mx • #promicro • #qmk • #handwired • #3d • #36key
Epi 32U4 by rallekralle11
Named after the Epipactis genus or orchids. The flower of one appears on the board.
Features
* USB power and data line ESD protection as well as power filtration and a fuse.
* Crenellated pins.
* No integrated voltage converter, only runs at 4,5-5,5v (down to 2,7 if you make it with an 8mhz crystal, or use the internal oscillator).
* USB-C connector sunk into the board, and slighly portruding from the end for panel mounting.
* 1,27mm pin spacing.
* Extra pins broken out.
* Holes where M2 bolts can be used to hold it in place.
* No rx/tx/power LEDs. Only one on pin 13 for testing.
* Includes some custom footprints with 3D models.
#mcu
Named after the Epipactis genus or orchids. The flower of one appears on the board.
Features
* USB power and data line ESD protection as well as power filtration and a fuse.
* Crenellated pins.
* No integrated voltage converter, only runs at 4,5-5,5v (down to 2,7 if you make it with an 8mhz crystal, or use the internal oscillator).
* USB-C connector sunk into the board, and slighly portruding from the end for panel mounting.
* 1,27mm pin spacing.
* Extra pins broken out.
* Holes where M2 bolts can be used to hold it in place.
* No rx/tx/power LEDs. Only one on pin 13 for testing.
* Includes some custom footprints with 3D models.
#mcu
keymap-drawer by caksoylar
Visualize your keymap using hold-taps and combos quickly, with automatic parsing
#designing
Visualize your keymap using hold-taps and combos quickly, with automatic parsing
#designing
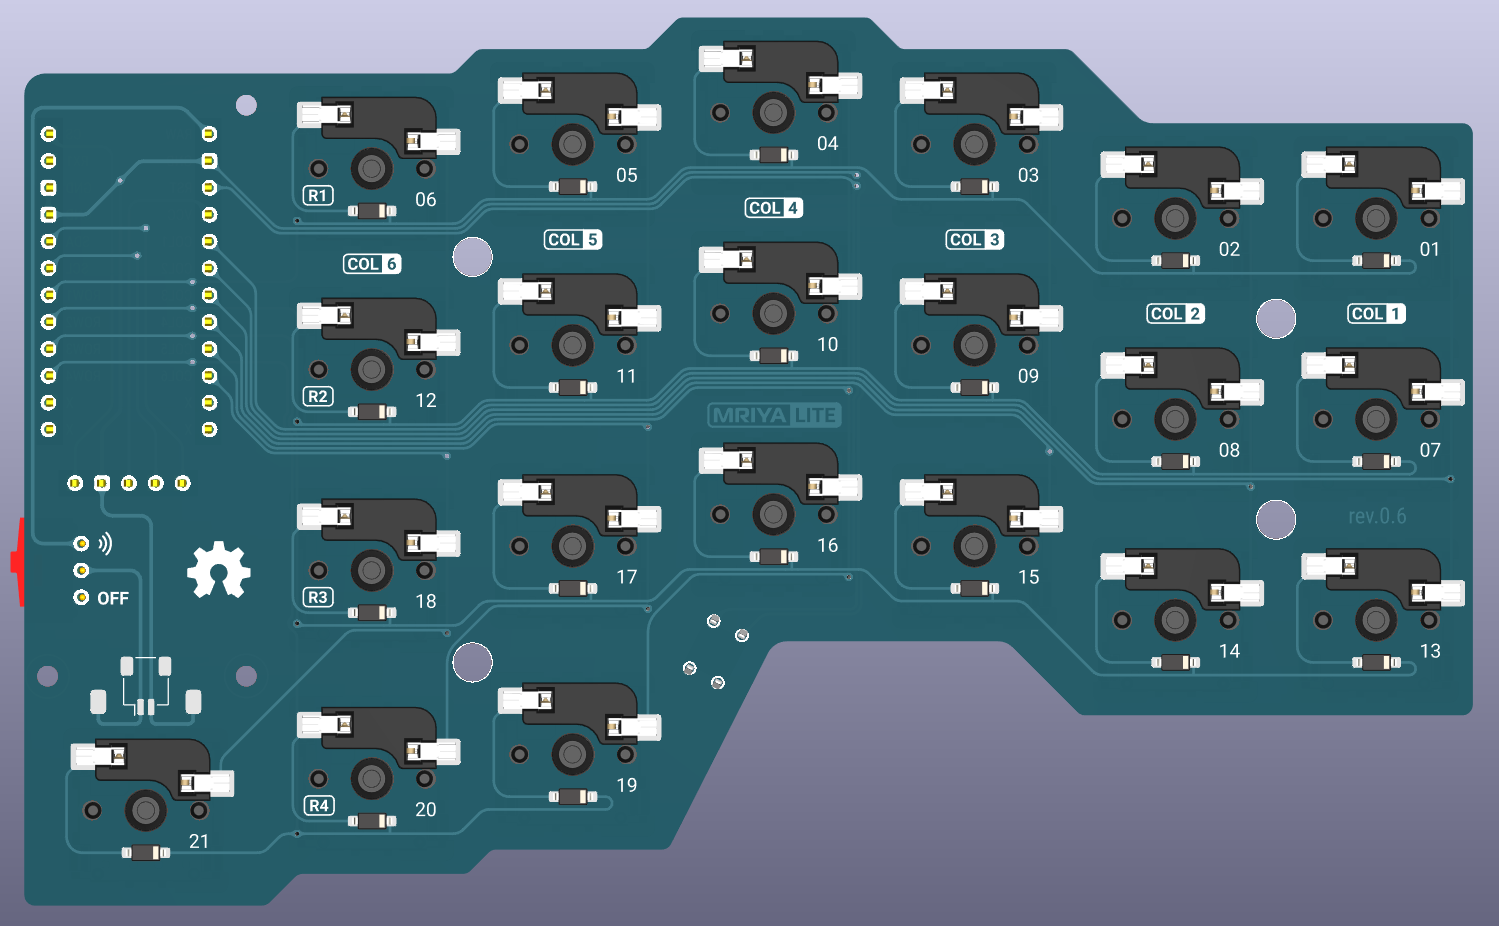
Наконец пришло вдохновение и я взялся за активную разработку MRIYA LITE (полностью беспроводной вариант моего форка Corne).
Принял решение изменить расположение диодов. Это сильно упростит монтаж. Пришлось практически полностью переделать трассировку, но это положительно сказалось на общем дизайне платы (на мой вкус).
Мне не понравился в использовании выключатель питания MSK-12C01-07, особенно его маленькая и неудобная ручка, которая неприятно врезается в палец при переключении. Расположение под портом контроллера также считаю неудачным решением - при использовании магнитных type-c коннекторов, сильно осложняется доступ к ручке выключателя. Посчитал логичным и более удобным вариантом вынос выключателя на боковую грань, на место TRRS гнезда. Сам выключатель я заменил на BSI-10H - он немного больше, но имеет более удобную и надёжную ручку, проще его монтаж.
Расположение батареи также было решено изменить. Теперь батарея будет располагаться между платой и нижним плейтом. Благодаря тому, что у меня 1.25u клавиши на крайних тамбах, получится установить 302035 на 150 мАч. В собранном виде батарею и провода не будет видно. Изначально планировал подключение через JST SH 1.0 коннектор, но сейчас склоняюсь к тому, чтобы оставить обычные площадки под пайку. Новое расположение батареи позволит установить более низкие хотсвап сокеты для контроллера (3.5 мм вместо 5 мм) - при использовании nice!view экранов, общая конструкция будет выглядеть немного изящнее.
В общем и целом, уже есть понимание, каким должен получиться конечный продукт. Осталось только реализовать задумки. Большое внимание хочу уделить корпусу клавиатуры, в планах три варианта: "продвинутый" сэндвич из карбона, стандартное "корытце" и бампер (примерно такой, как в Dao). Проект будет опенсорсным, но релизить буду только после того, как решу вопрос с корпусом. В июле планирую заказать платы.
#проекты
Принял решение изменить расположение диодов. Это сильно упростит монтаж. Пришлось практически полностью переделать трассировку, но это положительно сказалось на общем дизайне платы (на мой вкус).
Мне не понравился в использовании выключатель питания MSK-12C01-07, особенно его маленькая и неудобная ручка, которая неприятно врезается в палец при переключении. Расположение под портом контроллера также считаю неудачным решением - при использовании магнитных type-c коннекторов, сильно осложняется доступ к ручке выключателя. Посчитал логичным и более удобным вариантом вынос выключателя на боковую грань, на место TRRS гнезда. Сам выключатель я заменил на BSI-10H - он немного больше, но имеет более удобную и надёжную ручку, проще его монтаж.
Расположение батареи также было решено изменить. Теперь батарея будет располагаться между платой и нижним плейтом. Благодаря тому, что у меня 1.25u клавиши на крайних тамбах, получится установить 302035 на 150 мАч. В собранном виде батарею и провода не будет видно. Изначально планировал подключение через JST SH 1.0 коннектор, но сейчас склоняюсь к тому, чтобы оставить обычные площадки под пайку. Новое расположение батареи позволит установить более низкие хотсвап сокеты для контроллера (3.5 мм вместо 5 мм) - при использовании nice!view экранов, общая конструкция будет выглядеть немного изящнее.
В общем и целом, уже есть понимание, каким должен получиться конечный продукт. Осталось только реализовать задумки. Большое внимание хочу уделить корпусу клавиатуры, в планах три варианта: "продвинутый" сэндвич из карбона, стандартное "корытце" и бампер (примерно такой, как в Dao). Проект будет опенсорсным, но релизить буду только после того, как решу вопрос с корпусом. В июле планирую заказать платы.
#проекты
❤2👍1