
Hacking Articles Tips Tricks Videos Tutorials
Black Hat Ethical Hacking Write up: Steganography: Hide data in images and extract them https://www.blackhatethicalhacking.com/wp-content/uploads/2021/08/Untitled-design-2-1.png Write up: Steganography: Hide data in images and extract themPost Views: 2 SteganographyIn…
/secret message filename using the command below:
(You must then enter the passphrase to continue)
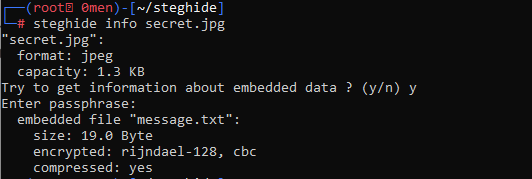
* Retrieve information of the embedded file (stego file)
The way to decode and reveal the secret message embed in the stego file. Make sure to rename or remove the original message.txt from the working folder when performing this command.
* Now the extracted message can be read and found in the working folder.
Use cat to read and confirm the embedded message.
https://www.blackhatethicalhacking.com/wp-content/uploads/2022/03/read_file.png
See Also: Write up: Detect malicious hacker activities on endpoints
2. Stegosuite: Is a graphical interface steganographic tool written in Python for hiding data/extracting data them from images and more features.
Modules:
* Error Level analysis
* Threshold analysis of the image
* Edge Detection
* Metadata analysis
Version: 0.8
Installation: Stegosuite is also available in the Kali Linux repo.
Creating an image with a secret message in it.
It’s a way easier method since no prior knowledge of bash scripting or terminal is required.
* Run the tool from the terminal by typing stegosuite in the terminal and then click enter or you can find it from the navigation menu.
https://www.blackhatethicalhacking.com/wp-content/uploads/2022/03/stegosuite_.png
* Click file from the menu bar and choose the image to hide the secret message
https://www.blackhatethicalhacking.com/wp-content/uploads/2022/03/file_selected.png
* You then just type the secret message, add the secret message.txt file
(right click on the embedded files and add it) that you want to embed, enter a password and click Embed.
https://www.blackhatethicalhacking.com/wp-content/uploads/2022/03/enter_message.png
* The stego file will be created on the same directory where the image was saved with the name _embed on the end.
e.g. original filename: test.jpg will be test_embed.jpg
* To extract the message just add the stego file from the file option on the header menu, type the password and click Extract.
* The secret message file will be saved also in the same directory where the stego file was saved with the same name that was embedded.
Thanks for checking out this write up, it was written by Black Hat Ethical Hacking members. The purpose is to make it easy for you choosing the guidelines and tips that we shared so you can enhance your experience and understand it, giving you more knowledge about Steganography.
If you think we have helped you, you can support us on Patreon.
Are u a security researcher? Or a company that writes articles or write ups about Cyber Security, Offensive Security (related to Information Security in general) that match with our specific audience and is worth sharing? If you want to express your idea in an article contact us here for a quote:
info (at) blackhatethicalhacking (dot) com https://www.blackhatethicalhacking.com/wp-content/uploads/2022/03/Merch.png Recent Articles* https://www.blackhatethicalhacking.com/wp-content/uploads/2022/02/MafiaBoy-the-hacker-who-took-down-the-Internet-90x90.png Hacking stories: MafiaBoy, the hacker who took down the Internet2 weeks ago
* https://www.blackhatethicalhacking.com/wp-content/uploads/2022/02/Detect-malicious-hacker-activities-on-endpoints-90x90.png Write up: Detect malicious hacker activities on endpoints3 weeks ago
* https://www.blackhatethicalhacking.com/wp-content/uploads/2022/01/Articles_Gallery-90x90.png How ILOVEYOU worm became the first global computer virus pandemic1 month ago
* https://www.blackhatethicalhac[...]
___________________________
@hacking_Attack
@Hacking_Video
(You must then enter the passphrase to continue)
steghide info secret.jpghttps://www.blackhatethicalhacking.com/wp-content/uploads/2022/03/info-1.png * Retrieve information of the embedded file (stego file)
The way to decode and reveal the secret message embed in the stego file. Make sure to rename or remove the original message.txt from the working folder when performing this command.
steghide extract -sf secret.jpghttps://www.blackhatethicalhacking.com/wp-content/uploads/2022/03/extract.png * Now the extracted message can be read and found in the working folder.
Use cat to read and confirm the embedded message.
https://www.blackhatethicalhacking.com/wp-content/uploads/2022/03/read_file.png
See Also: Write up: Detect malicious hacker activities on endpoints
2. Stegosuite: Is a graphical interface steganographic tool written in Python for hiding data/extracting data them from images and more features.
Modules:
* Error Level analysis
* Threshold analysis of the image
* Edge Detection
* Metadata analysis
Version: 0.8
Installation: Stegosuite is also available in the Kali Linux repo.
sudo apt-get install steghidehttps://www.blackhatethicalhacking.com/wp-content/uploads/2022/03/stegosuite_installation.png Creating an image with a secret message in it.
It’s a way easier method since no prior knowledge of bash scripting or terminal is required.
* Run the tool from the terminal by typing stegosuite in the terminal and then click enter or you can find it from the navigation menu.
https://www.blackhatethicalhacking.com/wp-content/uploads/2022/03/stegosuite_.png
* Click file from the menu bar and choose the image to hide the secret message
https://www.blackhatethicalhacking.com/wp-content/uploads/2022/03/file_selected.png
* You then just type the secret message, add the secret message.txt file
(right click on the embedded files and add it) that you want to embed, enter a password and click Embed.
https://www.blackhatethicalhacking.com/wp-content/uploads/2022/03/enter_message.png
* The stego file will be created on the same directory where the image was saved with the name _embed on the end.
e.g. original filename: test.jpg will be test_embed.jpg
* To extract the message just add the stego file from the file option on the header menu, type the password and click Extract.
* The secret message file will be saved also in the same directory where the stego file was saved with the same name that was embedded.
Thanks for checking out this write up, it was written by Black Hat Ethical Hacking members. The purpose is to make it easy for you choosing the guidelines and tips that we shared so you can enhance your experience and understand it, giving you more knowledge about Steganography.
If you think we have helped you, you can support us on Patreon.
Are u a security researcher? Or a company that writes articles or write ups about Cyber Security, Offensive Security (related to Information Security in general) that match with our specific audience and is worth sharing? If you want to express your idea in an article contact us here for a quote:
info (at) blackhatethicalhacking (dot) com https://www.blackhatethicalhacking.com/wp-content/uploads/2022/03/Merch.png Recent Articles* https://www.blackhatethicalhacking.com/wp-content/uploads/2022/02/MafiaBoy-the-hacker-who-took-down-the-Internet-90x90.png Hacking stories: MafiaBoy, the hacker who took down the Internet2 weeks ago
* https://www.blackhatethicalhacking.com/wp-content/uploads/2022/02/Detect-malicious-hacker-activities-on-endpoints-90x90.png Write up: Detect malicious hacker activities on endpoints3 weeks ago
* https://www.blackhatethicalhacking.com/wp-content/uploads/2022/01/Articles_Gallery-90x90.png How ILOVEYOU worm became the first global computer virus pandemic1 month ago
* https://www.blackhatethicalhac[...]
___________________________
@hacking_Attack
@Hacking_Video
Hacking Articles Tips Tricks Videos Tutorials
/secret message filename using the command below: (You must then enter the passphrase to continue) steghide info secret.jpghttps://www.blackhatethicalhacking.com/wp-content/uploads/2022/03/info-1.png * Retrieve information of the embedded file (stego file)…
king.com/wp-content/uploads/2021/12/Stuxnet-90x90.png Stuxnet – A weapon made out of code that almost started WW32 months ago
* https://www.blackhatethicalhacking.com/wp-content/uploads/2021/11/Article-90x90.png Hacking stories – Rafael Núñez (aka RaFa), hacking NASA with the hacking group: World of Hell4 months ago
* https://www.blackhatethicalhacking.com/wp-content/uploads/2021/10/operation-troy-90x90.png Hacking stories – Operation Troy – How researchers linked the cyberattacks5 months ago
* https://www.blackhatethicalhacking.com/wp-content/uploads/2021/09/Operation-Aurora-90x90.png Hacking stories – Operation Aurora: When China hacked Google6 months ago
* https://www.blackhatethicalhacking.com/wp-content/uploads/2021/08/The-first-botnet-hijacker-90x90.png Hacking stories – The first botnet hijacker aka the Zombie King7 months ago
* https://www.blackhatethicalhacking.com/wp-content/uploads/2021/07/featured_image_jonathan_james_hacker-90x90.png Hacking Stories: Jonathan James – The teenager who hacked NASA for fun8 months ago
* https://www.blackhatethicalhacking.com/wp-content/uploads/2021/06/Untitled-design-4-90x90.png Hacking Stories: Andrian Lamo – The ‘homeless’ Hacker9 months ago
The post Write up: Steganography: Hide data in images and extract them first appeared on Black Hat Ethical Hacking.
___________________________
@hacking_Attack
@Hacking_Video
* https://www.blackhatethicalhacking.com/wp-content/uploads/2021/11/Article-90x90.png Hacking stories – Rafael Núñez (aka RaFa), hacking NASA with the hacking group: World of Hell4 months ago
* https://www.blackhatethicalhacking.com/wp-content/uploads/2021/10/operation-troy-90x90.png Hacking stories – Operation Troy – How researchers linked the cyberattacks5 months ago
* https://www.blackhatethicalhacking.com/wp-content/uploads/2021/09/Operation-Aurora-90x90.png Hacking stories – Operation Aurora: When China hacked Google6 months ago
* https://www.blackhatethicalhacking.com/wp-content/uploads/2021/08/The-first-botnet-hijacker-90x90.png Hacking stories – The first botnet hijacker aka the Zombie King7 months ago
* https://www.blackhatethicalhacking.com/wp-content/uploads/2021/07/featured_image_jonathan_james_hacker-90x90.png Hacking Stories: Jonathan James – The teenager who hacked NASA for fun8 months ago
* https://www.blackhatethicalhacking.com/wp-content/uploads/2021/06/Untitled-design-4-90x90.png Hacking Stories: Andrian Lamo – The ‘homeless’ Hacker9 months ago
The post Write up: Steganography: Hide data in images and extract them first appeared on Black Hat Ethical Hacking.
___________________________
@hacking_Attack
@Hacking_Video

Hacking Articles Tips Tricks Videos Tutorials
Photo
Kali Linux Tutorials
RecoverPy : Interactively Find And Recover Deleted Or Overwritten Files From Your Terminal
RecoverPy searches through every block of your partition to find your request. You can already find plenty of solutions to recover deleted files, but it can be a hassle to recover overwritten files.
Installation
RecoverPy is currently only available on Linux systems.
Dependancies
Mandatory: To list and search through your partitions, recoverpy uses
Optional: To display real time grep progress, you can install
To install all dependencies:
* Debian-like:
* Arch:
* Fedora:
Installation from pip
Usage
python3 -m recoverpy
If you are not logged as root use
Select the system partition in which your file was. If you are out of luck, you can alternatively search in your home partition, maybe your IDE, text editor, etc. made a backup at some point.
Type a text string to search. See tips below for better results.
Note that searching a string in a whole partition may take a while. (see euphemism)
Default save path is
Start search, Results will appear in the left-hand box.
Select a result to display the corresponding partition block content in the right-hand box.
Once you have found your precious, select
You can now either save this block individually or explore neighboring blocks for the remaining parts of the file. You could then save it all in one file.
Download
___________________________
@hacking_Attack
@Hacking_Video
RecoverPy : Interactively Find And Recover Deleted Or Overwritten Files From Your Terminal
RecoverPy searches through every block of your partition to find your request. You can already find plenty of solutions to recover deleted files, but it can be a hassle to recover overwritten files.
Installation
RecoverPy is currently only available on Linux systems.
Dependancies
Mandatory: To list and search through your partitions, recoverpy uses
grep, dd, and lsblkcommands.Optional: To display real time grep progress, you can install
progress.To install all dependencies:
* Debian-like:
apt install grep coreutils util-linux progress* Arch:
pacman -S grep coreutils util-linux progress* Fedora:
dnf install grep coreutils util-linux progressInstallation from pip
python3 -m pip install recoverpyUsage
python3 -m recoverpy
If you are not logged as root use
sudo recoverpyor log in with su -before execution.Select the system partition in which your file was. If you are out of luck, you can alternatively search in your home partition, maybe your IDE, text editor, etc. made a backup at some point.
Type a text string to search. See tips below for better results.
Note that searching a string in a whole partition may take a while. (see euphemism)
Default save path is
/tmp/, click on Settings to edit configuration.Start search, Results will appear in the left-hand box.
Select a result to display the corresponding partition block content in the right-hand box.
Once you have found your precious, select
Save.You can now either save this block individually or explore neighboring blocks for the remaining parts of the file. You could then save it all in one file.
Download
___________________________
@hacking_Attack
@Hacking_Video
Kali Linux Tutorials
RecoverPy : Interactively Find And Recover Deleted Or Overwritten Files
RecoverPy searches through every block of your partition to find your request. You can already find plenty of solutions to recover.
Hacking Articles Tips Tricks Videos Tutorials
Photo
Kali Linux Tutorials
Rathole : A Lightweight, Stable And High-Performance Reverse Proxy For NAT Traversal
Rathole, like frp and ngrok, can help to expose the service on the device behind the NAT to the Internet, via a server with a public IP. Features* High Performance Much higher throughput can be achieved than frp, and more stable when handling a large volume of connections. See Benchmark
* Low Resource Consumption Consumes much fewer memory than similar tools. See Benchmark. The binary can be as small as ~500KiB to fit the constraints of devices, like embedded devices as routers.
* Security Tokens of services are mandatory and service-wise. The server and clients are responsible for their own configs. With the optional Noise Protocol, encryption can be configured at ease. No need to create a self-signed certificate! TLS is also supported.
* Hot Reload Services can be added or removed dynamically by hot-reloading the configuration file. HTTP API is WIP. QuickstartA full-powered
The usage of
To use
Assuming you have a NAS at home behind the NAT, and want to expose its ssh service to the Internet:
1. On the server which has a public IP
Create
server.toml
[server]
bind_addr = “0.0.0.0:2333” #
[server.services.my_nas_ssh]
token = “use_a_secret_that_only_you_know” # Token that is used to authenticate the client for the service. Change to a arbitrary value.
bind_addr = “0.0.0.0:5202” #
Then run:
./rathole server.toml
1. On the host which is behind the NAT (your NAS)
Create
remote_addr = “myserver.com:2333” # The address of the server. The port must be the same with the port in
token = “use_a_secret_that_only_you_know” # Must be the same with the server to pass the validation
local_addr = “127.0.0.1:22” # The address of the service that needs to be forwarded
1. Now the client will try to connect to the server
So you can
To run
But the
Before heading to the full configuration specification, it’s recommend to skim the configuration examples to get a feeling of the configuration format.
Se[...]
___________________________
@hacking_Attack
@Hacking_Video
Rathole : A Lightweight, Stable And High-Performance Reverse Proxy For NAT Traversal
Rathole, like frp and ngrok, can help to expose the service on the device behind the NAT to the Internet, via a server with a public IP. Features* High Performance Much higher throughput can be achieved than frp, and more stable when handling a large volume of connections. See Benchmark
* Low Resource Consumption Consumes much fewer memory than similar tools. See Benchmark. The binary can be as small as ~500KiB to fit the constraints of devices, like embedded devices as routers.
* Security Tokens of services are mandatory and service-wise. The server and clients are responsible for their own configs. With the optional Noise Protocol, encryption can be configured at ease. No need to create a self-signed certificate! TLS is also supported.
* Hot Reload Services can be added or removed dynamically by hot-reloading the configuration file. HTTP API is WIP. QuickstartA full-powered
ratholecan be obtained from the release page. Or build from source for other platforms and minimizing the binary. A Docker image is also available.The usage of
ratholeis very similar to frp. If you have experience with the latter, then the configuration is very easy for you. The only difference is that configuration of a service is split into the client side and the server side, and a token is mandatory.To use
rathole, you need a server with a public IP, and a device behind the NAT, where some services that need to be exposed to the Internet.Assuming you have a NAS at home behind the NAT, and want to expose its ssh service to the Internet:
1. On the server which has a public IP
Create
server.tomlwith the following content and accommodate it to your needs.server.toml
[server]
bind_addr = “0.0.0.0:2333” #
2333specifies the port that rathole listens for clients[server.services.my_nas_ssh]
token = “use_a_secret_that_only_you_know” # Token that is used to authenticate the client for the service. Change to a arbitrary value.
bind_addr = “0.0.0.0:5202” #
5202specifies the port that exposes my_nas_sshto the InternetThen run:
./rathole server.toml
1. On the host which is behind the NAT (your NAS)
Create
client.tomlwith the following content and accommodate it to your needs. client.toml[client]remote_addr = “myserver.com:2333” # The address of the server. The port must be the same with the port in
server.bind_addr[client.services.my_nas_ssh]token = “use_a_secret_that_only_you_know” # Must be the same with the server to pass the validation
local_addr = “127.0.0.1:22” # The address of the service that needs to be forwarded
1. Now the client will try to connect to the server
myserver.comon port 2333, and any traffic to myserver.com:5202will be forwarded to the client’s port 22.So you can
ssh myserver.com:5202to ssh to your NAS.To run
ratholerun as a background service on Linux, checkout the systemd examples. Configurationratholecan automatically determine to run in the server mode or the client mode, according to the content of the configuration file, if only one of [server]and [client]block is present, like the example in Quickstart.But the
[client]and [server]block can also be put in one file. Then on the server side, run rathole --server config.tomland on the client side, run rathole --client config.tomlto explicitly tell ratholethe running mode.Before heading to the full configuration specification, it’s recommend to skim the configuration examples to get a feeling of the configuration format.
Se[...]
___________________________
@hacking_Attack
@Hacking_Video
Kali Linux Tutorials
Rathole : A Lightweight, Stable And High-Performance Reverse Proxy
Rathole, like frp and ngrok, can help to expose the service on the device behind the NAT to the Internet, via a server with a public IP.
Hacking Articles Tips Tricks Videos Tutorials
Kali Linux Tutorials Rathole : A Lightweight, Stable And High-Performance Reverse Proxy For NAT Traversal Rathole, like frp and ngrok, can help to expose the service on the device behind the NAT to the Internet, via a server with a public IP. Features* High…
e Transport for more details about encryption and the
Here is the full configuration specification
[client]
remote_addr = “example.com:2333” # Necessary. The address of the server
default_token = “default_token_if_not_specify” # Optional. The default token of services, if they don’t define their own ones
heartbeat_timeout = 40 # Optional. Set to 0 to disable the application-layer heartbeat test. The value must be greater than
[client.transport] # The whole block is optional. Specify which transport to use
type = “tcp” # Optional. Possible values: [“tcp”, “tls”, “noise”]. Default: “tcp”
[client.transport.tcp] # Optional. Also affects
nodelay = false # Optional. Determine whether to enable TCP_NODELAY, if applicable, to improve the latency but decrease the bandwidth. Default: false
keepalive_secs = 20 # Optional. Specify
keepalive_interval = 8 # Optional. Specify
[client.transport.tls] # Necessary if
trusted_root = “ca.pem” # Necessary. The certificate of CA that signed the server’s certificate
hostname = “example.com” # Optional. The hostname that the client uses to validate the certificate. If not set, fallback to
pattern = “Noise_NK_25519_ChaChaPoly_BLAKE2s” # Optional. Default value as shown
local_private_key = “key_encoded_in_base64” # Optional
remote_public_key = “key_encoded_in_base64” # Optional
[client.services.service1] # A service that needs forwarding. The name
type = “tcp” # Optional. The protocol that needs forwarding. Possible values: [“tcp”, “udp”]. Default: “tcp”
token = “whatever” # Necessary if
local_addr = “127.0.0.1:1081” # Necessary. The address of the service that needs to be forwarded
nodelay = false # Optional. Determine whether to enable TCP_NODELAY for data transmission, if applicable, to improve the latency but decrease the bandwidth. Default: false
[client.services.service2] # Multiple services can be defined
local_addr = “127.0.0.1:1082”
[server]
bind_addr = “0.0.0.0:2333” # Necessary. The address that the server listens for clients. Generally only the port needs to be change.
default_token = “default_token_if_not_specify” # Optional
heartbeat_interval = 30 # Optional. The interval between two application-layer heartbeat. Set to 0 to disable sending heartbeat. Default: 30 seconds
[server.transport] # Same as
[server.transport.tcp] # Same as the client
nodelay = false
keepalive_secs = 20
keepalive_interval = 8
[server.transport.tls] # Necessary if
pkcs12 = “identify.pfx” # Necessary. pkcs12 file of server’s certificate and private key
pkcs12_password = “password” # Necessary. Password of the pkcs12 file
[server.transport.noise] # Same as
local_private_key = “key_encoded_in_base64”
remote_public_key = “key_encoded_in_base64”
[server.services.service1] # The service name must be identical to the client side
type = “tcp” # Optional. Same as the client
bind_addr = “0.0.0.0:8081” # Necessary. The address of the service is exposed at. Generally only [...]
___________________________
@hacking_Attack
@Hacking_Video
transportblock.Here is the full configuration specification
[client]
remote_addr = “example.com:2333” # Necessary. The address of the server
default_token = “default_token_if_not_specify” # Optional. The default token of services, if they don’t define their own ones
heartbeat_timeout = 40 # Optional. Set to 0 to disable the application-layer heartbeat test. The value must be greater than
server.heartbeat_interval. Default: 40 seconds[client.transport] # The whole block is optional. Specify which transport to use
type = “tcp” # Optional. Possible values: [“tcp”, “tls”, “noise”]. Default: “tcp”
[client.transport.tcp] # Optional. Also affects
noiseand tlsproxy = “socks5://user:passwd@127.0.0.1:1080” # Optional. The proxy used to connect to the server. httpand socks5is supported.nodelay = false # Optional. Determine whether to enable TCP_NODELAY, if applicable, to improve the latency but decrease the bandwidth. Default: false
keepalive_secs = 20 # Optional. Specify
tcp_keepalive_timein tcp(7), if applicable. Default: 20 secondskeepalive_interval = 8 # Optional. Specify
tcp_keepalive_intvlin tcp(7), if applicable. Default: 8 seconds[client.transport.tls] # Necessary if
typeis “tls”trusted_root = “ca.pem” # Necessary. The certificate of CA that signed the server’s certificate
hostname = “example.com” # Optional. The hostname that the client uses to validate the certificate. If not set, fallback to
client.remote_addr[client.transport.noise] # Noise protocol. See docs/transport.mdfor further explanationpattern = “Noise_NK_25519_ChaChaPoly_BLAKE2s” # Optional. Default value as shown
local_private_key = “key_encoded_in_base64” # Optional
remote_public_key = “key_encoded_in_base64” # Optional
[client.services.service1] # A service that needs forwarding. The name
service1can change arbitrarily, as long as identical to the name in the server’s configurationtype = “tcp” # Optional. The protocol that needs forwarding. Possible values: [“tcp”, “udp”]. Default: “tcp”
token = “whatever” # Necessary if
client.default_tokennot setlocal_addr = “127.0.0.1:1081” # Necessary. The address of the service that needs to be forwarded
nodelay = false # Optional. Determine whether to enable TCP_NODELAY for data transmission, if applicable, to improve the latency but decrease the bandwidth. Default: false
[client.services.service2] # Multiple services can be defined
local_addr = “127.0.0.1:1082”
[server]
bind_addr = “0.0.0.0:2333” # Necessary. The address that the server listens for clients. Generally only the port needs to be change.
default_token = “default_token_if_not_specify” # Optional
heartbeat_interval = 30 # Optional. The interval between two application-layer heartbeat. Set to 0 to disable sending heartbeat. Default: 30 seconds
[server.transport] # Same as
[client.transport]type = “tcp”[server.transport.tcp] # Same as the client
nodelay = false
keepalive_secs = 20
keepalive_interval = 8
[server.transport.tls] # Necessary if
typeis “tls”pkcs12 = “identify.pfx” # Necessary. pkcs12 file of server’s certificate and private key
pkcs12_password = “password” # Necessary. Password of the pkcs12 file
[server.transport.noise] # Same as
[client.transport.noise]pattern = “Noise_NK_25519_ChaChaPoly_BLAKE2s”local_private_key = “key_encoded_in_base64”
remote_public_key = “key_encoded_in_base64”
[server.services.service1] # The service name must be identical to the client side
type = “tcp” # Optional. Same as the client
[client.services.X.type] token = "whatever" # Necessary ifserver.default_token` not setbind_addr = “0.0.0.0:8081” # Necessary. The address of the service is exposed at. Generally only [...]
___________________________
@hacking_Attack
@Hacking_Video
Hacking Articles Tips Tricks Videos Tutorials
e Transport for more details about encryption and the transportblock. Here is the full configuration specification [client] remote_addr = “example.com:2333” # Necessary. The address of the server default_token = “default_token_if_not_specify” # Optional.…
the port needs to be change.
nodelay = false # Optional. Same as the client
[server.services.service2]
bind_addr = “0.0.0.1:8082” Logging
RUST_LOG=error ./rathole config.toml Benchmarkrathole has similar latency to frp, but can handle a more connections, provide larger bandwidth, with less memory usage.
For more details, see the separate page Benchmark.
However, don’t take it from here that
* TLS support
* UDP support
* Hot reloading
* HTTP APIs for configuration Download
___________________________
@hacking_Attack
@Hacking_Video
nodelay = false # Optional. Same as the client
[server.services.service2]
bind_addr = “0.0.0.1:8082” Logging
rathole, like many other Rust programs, use environment variables to control the logging level. info, warn, error, debug, traceare available.RUST_LOG=error ./rathole config.toml Benchmarkrathole has similar latency to frp, but can handle a more connections, provide larger bandwidth, with less memory usage.
For more details, see the separate page Benchmark.
However, don’t take it from here that
ratholecan magically make your forwarded service faster several times than before. The benchmark is done on local loopback, indicating the performance when the task is cpu-bounded. One can gain quite a improvement if the network is not the bottleneck. Unfortunately, that’s not true for many users. In that case, the main benefit is lower resource consumption, while the bandwidth and the latency may not improved significantly. Development Statusratholeis under active development. A load of features is on the way:* TLS support
* UDP support
* Hot reloading
* HTTP APIs for configuration Download
___________________________
@hacking_Attack
@Hacking_Video
hacking: security in practice
Security conference in 2022
Hello, could you recommend some worth security conference in 2022 in Europe?
submitted by /u/boch33n
[link] [comments]
___________________________
@hacking_Attack
@Hacking_Video
Security conference in 2022
Hello, could you recommend some worth security conference in 2022 in Europe?
submitted by /u/boch33n
[link] [comments]
___________________________
@hacking_Attack
@Hacking_Video
reddit
Security conference in 2022
Hello, could you recommend some worth security conference in 2022 in Europe?
hacking: security in practice
Changing a return address from a buffer overflow attack
___________________________
@hacking_Attack
@Hacking_Video
Changing a return address from a buffer overflow attack
___________________________
@hacking_Attack
@Hacking_Video
reddit
Changing a return address from a buffer overflow attack
I'm trying to implement buffer overflow for a class, and I'm very intimidated by the assembly code just on my first problem. I have a server,...
hacking: security in practice
i tried what happens if u like ur comment from ur 2. account with vpn in youtube it didnt allow to like i tried this for wonder
youtube is very strict
submitted by /u/god_rays
[link] [comments]
___________________________
@hacking_Attack
@Hacking_Video
i tried what happens if u like ur comment from ur 2. account with vpn in youtube it didnt allow to like i tried this for wonder
youtube is very strict
submitted by /u/god_rays
[link] [comments]
___________________________
@hacking_Attack
@Hacking_Video
reddit
i tried what happens if u like ur comment from ur 2. account with...
youtube is very strict
Hacking Articles Tips Tricks Videos Tutorials
Photo
hacking: security in practice
I have an usb stick but when i try to open it a password screen pops up. How could i open it without the password.
It's a dead relatives and I'd like to get it open. Looks like this. Only 2 tries left.
Not sure if this fits the sub.
submitted by /u/gjorgeborge
[link] [comments]
___________________________
@hacking_Attack
@Hacking_Video
I have an usb stick but when i try to open it a password screen pops up. How could i open it without the password.
It's a dead relatives and I'd like to get it open. Looks like this. Only 2 tries left.
Not sure if this fits the sub.
submitted by /u/gjorgeborge
[link] [comments]
___________________________
@hacking_Attack
@Hacking_Video
reddit
I have an usb stick but when i try to open it a password screen...
It's a dead relatives and I'd like to get it open. [Looks like this. Only 2 tries left.](https://imgur.com/a/NGj7FW9) Not sure if this fits...
Hacking on Medium
The Russian illusion
If you haven't heard, there is a cyberwar taking place. This cyberwar comprises team Russia and everyone who opposes Russia's decision to…
Continue reading on Medium »
___________________________
@hacking_Attack
@Hacking_Video
The Russian illusion
If you haven't heard, there is a cyberwar taking place. This cyberwar comprises team Russia and everyone who opposes Russia's decision to…
Continue reading on Medium »
___________________________
@hacking_Attack
@Hacking_Video
Medium
The Russian illusion
If you haven't heard, there is a cyberwar taking place. This cyberwar comprises team Russia and everyone who opposes Russia's decision to…
Hacking on Medium
Pentesting Tools to Know
https://cdn-images-1.medium.com/max/896/1*izddjb1rdn5rFyYs0uSLCg.jpeg
From Asset Discovery to Directory/File Brute-Forcing to Password Cracking
Continue reading on Medium »
___________________________
@hacking_Attack
@Hacking_Video
Pentesting Tools to Know
https://cdn-images-1.medium.com/max/896/1*izddjb1rdn5rFyYs0uSLCg.jpeg
From Asset Discovery to Directory/File Brute-Forcing to Password Cracking
Continue reading on Medium »
___________________________
@hacking_Attack
@Hacking_Video
Medium
Pentesting Tools to Know
From Asset Discovery to Directory/File Brute-Forcing to Password Cracking
Hacking on Medium
HackTheBox — Devzat
https://cdn-images-1.medium.com/max/869/0*9LzjJ_ICN9A3Tb4G.png
Devzat is a medium difficulty box in HackTheBox
Continue reading on Medium »
___________________________
@hacking_Attack
@Hacking_Video
HackTheBox — Devzat
https://cdn-images-1.medium.com/max/869/0*9LzjJ_ICN9A3Tb4G.png
Devzat is a medium difficulty box in HackTheBox
Continue reading on Medium »
___________________________
@hacking_Attack
@Hacking_Video
Medium
HackTheBox — Devzat
Devzat is a medium difficulty box in HackTheBox
Hacking Articles Tips Tricks Videos Tutorials
Photo
Dark Reading: Attacks/Breaches
SentinelOne to Buy Attivo Networks in $616.5M Deal
Attivo's identity threat detection and response is "an integral part" of SentinelOne's XDR strategy, SentinelOne CEO says.
___________________________
@hacking_Attack
@Hacking_Video
SentinelOne to Buy Attivo Networks in $616.5M Deal
Attivo's identity threat detection and response is "an integral part" of SentinelOne's XDR strategy, SentinelOne CEO says.
___________________________
@hacking_Attack
@Hacking_Video
Dark Reading
SentinelOne to Buy Attivo Networks in $616.5M Deal
Attivo's identity threat detection and response is "an integral part" of SentinelOne's XDR strategy, SentinelOne CEO says.