Forwarded from Piping Stress Analysis (PSA Group)
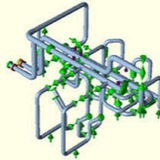
Reboiler piping Design & Stress analysis
Forwarded from Piping Stress Analysis (PSA Group)
Reboiler notes:
1- Horizontal reboilers shall be as close to the tower as practical with a minimum amount of pipe and elbows. The piping shall be stress analyzed as soon as the layout is firm. Support and anchor points shall be established at this time.
2- The following information is required by the piping designer in order to layout thermal siphon reboilers:
2-1- The elevation of the tower tangent line above grade
2-2- The elevation of the first tray and the reboiler return line
2-3- The length of the reboiler tubes and the type of outlet on the reboiler on the exchangers
2-4- The dimension from the tangent line to the tubesheet on vertical exchangers and bottom of horizontal exchangers
2-5- Most of this information is shown on the flow diagrams, vessel and reboiler specifications. The design shall review the layout with the process engineer to ensure that complete agreement is reached
3- Avoid locating the reboiler return line under the downcomer. The top of the return line shall be a minimum of 12 inches below the bottom tray or 6 inches below the seal pan if the return line must be located under the downcomer.
4- Allow sufficient room for removing tube bundles on vertical reboilers. Allow sufficient room to remove shell cover to grade.
1- Horizontal reboilers shall be as close to the tower as practical with a minimum amount of pipe and elbows. The piping shall be stress analyzed as soon as the layout is firm. Support and anchor points shall be established at this time.
2- The following information is required by the piping designer in order to layout thermal siphon reboilers:
2-1- The elevation of the tower tangent line above grade
2-2- The elevation of the first tray and the reboiler return line
2-3- The length of the reboiler tubes and the type of outlet on the reboiler on the exchangers
2-4- The dimension from the tangent line to the tubesheet on vertical exchangers and bottom of horizontal exchangers
2-5- Most of this information is shown on the flow diagrams, vessel and reboiler specifications. The design shall review the layout with the process engineer to ensure that complete agreement is reached
3- Avoid locating the reboiler return line under the downcomer. The top of the return line shall be a minimum of 12 inches below the bottom tray or 6 inches below the seal pan if the return line must be located under the downcomer.
4- Allow sufficient room for removing tube bundles on vertical reboilers. Allow sufficient room to remove shell cover to grade.
PipeHanger_DesignEngineering_Catalog.pdf
1.4 MB
PIPING and PIPE HANGER DESIGN and ENGINEERING "ANVIL"
DETERMINATION OF MAXIMUM ALLOWABLE LONGITUDINAL EXTENT OF CORROSION - ANSI B.31.G - 1991
The depth of a corrosion pit may be expressed as a percent of nominal wall thickness of pipe by:
% pit depth = 100 (1)
where
d = measured maximum depth of the corroded area(inches).
t = nominal wall thickness of pipe(inches). Additional wall thickness required for concurrent external loads shall not be included in the calculation.
A contiguous corroded area having a maximum depth of more then 10 % but less than 80 % of the nominal wall thickness of the pipe should not extend along the longitudinal axis of the pipe for a distance greater than that calculated from:
L=1.12 B (Dt)^0.5 (2)
where
L = maximum allowable longitudinal extent of the corroded area(inches).
D = nominal outside diameter of the pipe(inches).
B = a value which may be determined from :
B=(((d/t)/(1.1(d/t)-0.15))^2-1)^0.5 (3)
except that B may not exceed the value 4. If the corrosion depth is between 10% and 80%, use B = 4.0 in Equation (2).
The depth of a corrosion pit may be expressed as a percent of nominal wall thickness of pipe by:
% pit depth = 100 (1)
where
d = measured maximum depth of the corroded area(inches).
t = nominal wall thickness of pipe(inches). Additional wall thickness required for concurrent external loads shall not be included in the calculation.
A contiguous corroded area having a maximum depth of more then 10 % but less than 80 % of the nominal wall thickness of the pipe should not extend along the longitudinal axis of the pipe for a distance greater than that calculated from:
L=1.12 B (Dt)^0.5 (2)
where
L = maximum allowable longitudinal extent of the corroded area(inches).
D = nominal outside diameter of the pipe(inches).
B = a value which may be determined from :
B=(((d/t)/(1.1(d/t)-0.15))^2-1)^0.5 (3)
except that B may not exceed the value 4. If the corrosion depth is between 10% and 80%, use B = 4.0 in Equation (2).
Static Method of Wind Analysis of Piping systems in Caesar II using Pressure Vs elevation Method✍️
Criteria for selection of lines for Wind Analysis:⬇️
Criteria should be mentioned in ITB document. As a guideline the following can be followed after verification from client:
• Lines with outside diameter 12” and larger (including insulation) running on 10 m and above.
• Steam / Flare header on the pipe rack.
• Other lines considered important as per stress engineer’s decision.
However if lines are covered by some shelter or other structures then wind analysis can be ignored for those lines.
Criteria should be mentioned in ITB document. As a guideline the following can be followed after verification from client:
• Lines with outside diameter 12” and larger (including insulation) running on 10 m and above.
• Steam / Flare header on the pipe rack.
• Other lines considered important as per stress engineer’s decision.
However if lines are covered by some shelter or other structures then wind analysis can be ignored for those lines.
Data Required for Wind Analysis:⬇️
For wind analysis you must have following data from the client.
• Wind shape factor: Normally for pipe elements the data varies from 0.6-0.8. Check in ITB what value it says to use.
• Pressure Vs Elevation Profile: Sometimes client provides this profile directly and sometimes provides equation and data to calculate the profile. A typical wind profile will be shown in diagram while explaining the steps required while analyzing using Caesar II.
• Elevation of the line under analysis. If HPP elevation is other than 0 you have to reduce HPP from line global elevation to get actual elevation.
For wind analysis you must have following data from the client.
• Wind shape factor: Normally for pipe elements the data varies from 0.6-0.8. Check in ITB what value it says to use.
• Pressure Vs Elevation Profile: Sometimes client provides this profile directly and sometimes provides equation and data to calculate the profile. A typical wind profile will be shown in diagram while explaining the steps required while analyzing using Caesar II.
• Elevation of the line under analysis. If HPP elevation is other than 0 you have to reduce HPP from line global elevation to get actual elevation.
What to check:⬇️
As per code B 31.3 we have to check code compliance of the calculated stress (Sustained +Wind). The allowable stress for wind analysis is 1.33 times Sh values. However sometimes client requires to check the nozzle loading in Operating+ Wind cases (W+T+P+Win) for static equipment. Normally client does not require wind load checking for rotating equipment.
As per code B 31.3 we have to check code compliance of the calculated stress (Sustained +Wind). The allowable stress for wind analysis is 1.33 times Sh values. However sometimes client requires to check the nozzle loading in Operating+ Wind cases (W+T+P+Win) for static equipment. Normally client does not require wind load checking for rotating equipment.
Steps for Static Analysis in Caesar II:⬇️
Most of the steps are mentioned in attached images. All are self explanatory.
• Model the piping system under analysis from piping isometric drawings.
• Enter elevation of the first node in global coordinates.
• Click on Wind/Wave check box on Caesar II Spreadsheet and mention wind shape factor as shown in Fig. 1
Most of the steps are mentioned in attached images. All are self explanatory.
• Model the piping system under analysis from piping isometric drawings.
• Enter elevation of the first node in global coordinates.
• Click on Wind/Wave check box on Caesar II Spreadsheet and mention wind shape factor as shown in Fig. 1
• Now run the analysis and go to the load case editor and select Pressure Vs Elevation as shown in Fig. 2
• In next step enter the pressure vs elevation profile in consistent unit and enter wind direction cosines as shown in Fig. 3. Normally wind analysis is performed considering wind flow from North, South, East and West direction. Accordingly Enter +1 or -1 in X or Z direction. Wind analysis is generally not considered in vertical direction.
• Refer Fig. 4 and prepare the highlighted load cases additionally for wind analysis. Load cases for L17 to L20 are for code compliance checking and load cases from L5 to L8 for support and Nozzle load checking.
• Refer Fig 5 and make the combination method as scalar or absolute for the shown load cases.