Greeting!!!
ကျန်းမာရေးမကောင်းလို့၊ ဒီ Channel ကို ဆက်မလုပ်နိုင်တာကြာပြီ. ညီလေးတစ်ယောက်က prohibited 18+ content တွေ မန့်တွေမှာအရမ်းများနေတယ်ဆိုလို့ လာပိတ်တာ. ဒီကြားထဲအဆင်ပြေရင် post တွေပြန်တင်ပေးပါမယ်.
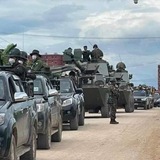
ပုံကတော့ KIA+PDF ပေါင်းပြီးသိမ်းတာခံလိုက်ရတဲ့ ဗန်းမော်က အမြောက်တပ်နဲ့ သံချပ်ကာတပ်တွေပါ.
ကျန်းမာရေးမကောင်းလို့၊ ဒီ Channel ကို ဆက်မလုပ်နိုင်တာကြာပြီ. ညီလေးတစ်ယောက်က prohibited 18+ content တွေ မန့်တွေမှာအရမ်းများနေတယ်ဆိုလို့ လာပိတ်တာ. ဒီကြားထဲအဆင်ပြေရင် post တွေပြန်တင်ပေးပါမယ်.
ပုံကတော့ KIA+PDF ပေါင်းပြီးသိမ်းတာခံလိုက်ရတဲ့ ဗန်းမော်က အမြောက်တပ်နဲ့ သံချပ်ကာတပ်တွေပါ.
Myanmar Army’s Newly Designed Drop Bomb Resistant Bunker
ဒါကတော့ မြန်မာ့တပ်မတော်ရဲ့ Drone ကချတဲ့ drop bomb ဒဏ်ခံဘန်ကာ design ပါ. ဘယ်ကောင်မြှောက်ပေးပြီး ဘယ်လိုရွှေဉာဏ်တော်နဲ့ approve ပေးလိုက်တယ်မသိပါဘူး. သေနတ်ပစ်ပေါက်က ပြောင်းပြန်. သောက်သုံရေလိုင်းလည်းမပါ၊ အိမ်သာလည်းမပါ. အံမယ် ကြွေပြားကြခင်းထားတယ်ဗျ. လူကြီးလာစစ်ရင် ကြည့်ကောင်းအောင်ထင်တယ်. ကဲ.. ဝိုင်းပြီး ဩဘာပေးခဲ့ကြပါဦး.
#MCWTF
Media is too big
VIEW IN TELEGRAM
Myanmar Armed Force's Air Strike and Drone Strike footages during Banmaw Battle
Location - 24°16'01.4"N 97°13'33.0"E (MAF Northern Command Area)
Separated detail footages will coming soon! STAY TUNE!!
Location - 24°16'01.4"N 97°13'33.0"E (MAF Northern Command Area)
Separated detail footages will coming soon! STAY TUNE!!
Media is too big
VIEW IN TELEGRAM
Myanmar Armed Force's Air Strike and Drone Strike footages during Banmaw Battle (2)
Firstly, MAF drone team attacked with drop bomb on KIA+PDF garrison and drone guard vehicle. A few minutes later, Myanmar Air Force conducted the air strike on that area with large calibre munition (probably 1000 kg bomb). The target building is completely wiped out and at least 1000m radius have been badly effected. And drone guard vehicle also destroyed.
ဗန်းမော်တိုက်ပွဲ တွင် မြန်မာ့တပ်မတော်၏ လေကြောင်းတိုက်ခိုက်မှုနှင့် Drone တိုက်ခိုက်မှု မှတ်တမ်းများ (၂)
ပထမဦးစွာ MAF Drone အဖွဲ့သည် KIA+PDF တပ်ဖွဲ့ဝင်မျညး ခိုအောင်းနေသည့်နေရာနှင့် Drone Guard ယာဉ်အား ဗုံးကြဲတိုက်ခိုက်ခဲ့သည်။ မိနစ်အနည်းငယ်အကြာတွင် မြန်မာလေတပ်သည် ထိုနေရာတစ်ဝိုက်ကို ကြီးမားသောဗုံးကိုအသုံးပြုပြီး (၁၀၀၀ ကီလိုဂရမ်ရှိ ဗုံးဟု ယူဆနိုင်သည်) လေကြောင်းမှ တိုက်ခိုက်ခဲ့သည်။ ပစ်မှတ် အဆောက်အအုံဟာ လုံးဝပျောက်ကွယ်သွားပြီး အနည်းဆုံး မီတာ ၁၀၀၀ အချင်းဝက်အတွင်းဟာ ဗုံးဒဏ်ကြောင့် ဆိုးဆိုးရွားရွား ထိခိုက်ခဲ့သည်။ Drone Guard ်ယာဉ်လည်း ပျက်ဆီးခဲ့ပါတယ်။
Media is too big
VIEW IN TELEGRAM
Myanmar Army Counter Offensive in North Eastern Command Area (Taung Hkam Battle)
နောင်ချိုနယ်မြေ၊ တောင်ခမ်းနယ်၊ မကျီးရေရွာ
Situation - Clash in Progress
Location - 22.073441005436617, 96.87199737936231
နောင်ချိုနယ်မြေ၊ တောင်ခမ်းနယ်၊ မကျီးရေရွာ
Situation - Clash in Progress
Location - 22.073441005436617, 96.87199737936231
Media is too big
VIEW IN TELEGRAM
The Battle of Maungdaw: A Record of the Conflict Between the MAF and AA
Situation: Concluded on December 8, 2024, with the defeat of the MAF
Location: 20.825826040460317, 92.39031941298354 (MAF Western Command Area)
The Arakan Army (AA) captured the No. 5 Border Guard Police Battalion (BGP-5) in Maungdaw Town, the final MAF stronghold in northern Rakhine State. The battle lasted over two months, with significant AA casualties. Despite fierce defense by BGP-5, led by Brigadier General Thurein Htun, the defenders surrendered due to critical shortages of food, medicine, and water.
Senior MAF commanders failed to provide sufficient supplies or reinforcements to strengthen the defense of BGP-5, despite having access to numerous naval vessels. This shortage of supply resulted in heavy casualties, serving as a grim reminder of the weakness of the MAF's logistical support.
The AA employed tunnel warfare and seized heavy artillery, including a 105-mm towed howitzer and 122mm MLRS, from MAF positions.
#MCWTF
Latest Update at Banmaw Battle
MAF troops collected the 5x Arms and dead bodies of KIA+PDF at the countryside area of Banmaw.
Location - 24°16'01.4"N 97°13'33.0"E (MAF Northern Command Area)
MAF troops collected the 5x Arms and dead bodies of KIA+PDF at the countryside area of Banmaw.
Location - 24°16'01.4"N 97°13'33.0"E (MAF Northern Command Area)
Media is too big
VIEW IN TELEGRAM
Myanmar Armed Force's Air Strike and Drone Strike footages during Banmaw Battle (3)
Location - 24°16'01.4"N 97°13'33.0"E (MAF Northern Command Area)
ဗန်းမော်တိုက်ပွဲ တွင် မြန်မာ့တပ်မတော်၏ လေကြောင်းတိုက်ခိုက်မှုနှင့် Drone တိုက်ခိုက်မှု မှတ်တမ်းများ (၃)
Location - 24°16'01.4"N 97°13'33.0"E (MAF Northern Command Area)
ဗန်းမော်တိုက်ပွဲ တွင် မြန်မာ့တပ်မတော်၏ လေကြောင်းတိုက်ခိုက်မှုနှင့် Drone တိုက်ခိုက်မှု မှတ်တမ်းများ (၃)
Media is too big
VIEW IN TELEGRAM
Myanmar Armed Force's Air Strike and Drone Strike footages during Banmaw Battle (4)
Location - 24°16'01.4"N 97°13'33.0"E (MAF Northern Command Area)
ဗန်းမော်တိုက်ပွဲ တွင် မြန်မာ့တပ်မတော်၏ လေကြောင်းတိုက်ခိုက်မှုနှင့် Drone တိုက်ခိုက်မှု မှတ်တမ်းများ (၄)
Location - 24°16'01.4"N 97°13'33.0"E (MAF Northern Command Area)
ဗန်းမော်တိုက်ပွဲ တွင် မြန်မာ့တပ်မတော်၏ လေကြောင်းတိုက်ခိုက်မှုနှင့် Drone တိုက်ခိုက်မှု မှတ်တမ်းများ (၄)
This media is not supported in your browser
VIEW IN TELEGRAM
Myanmar Army Drone Force
Media is too big
VIEW IN TELEGRAM
Myanmar Armed Force's Air Strike and Drone Strike footages during Banmaw Battle (5)
Myanmar Army Drone Force using the Loitering Munitions to destroy the Drone Guard vehicle.
Location - 24°16'01.4"N 97°13'33.0"E (MAF Northern Command Area)
ဗန်းမော်တိုက်ပွဲ တွင် မြန်မာ့တပ်မတော်၏ လေကြောင်းတိုက်ခိုက်မှုနှင့် Drone တိုက်ခိုက်မှု မှတ်တမ်းများ (၅)
မြန်မာ့တပ်မတော် Drone တပ်ဖွဲ့မှ အသေခံဒရုန်းများအသုံး
Media is too big
VIEW IN TELEGRAM
Myanmar Army's Combined Attacks on KIA+PDF position in Banmaw Battle
ဗန်းမော်တိုက်ပွဲတွင် ခြေလျင်+သံချပ်ကာ+ဒရုန်းပေါင်းစပ်တိုက်ခိုက်နေပုံ
ဗန်းမော်တိုက်ပွဲတွင် ခြေလျင်+သံချပ်ကာ+ဒရုန်းပေါင်းစပ်တိုက်ခိုက်နေပုံ